Sunday, 31 January 2016

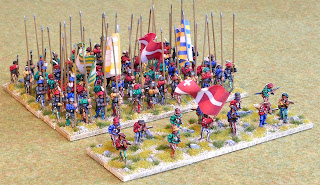
French Crossbowmen - Aventuriers (1)

I always intended to have some light infantry crossbowmen for my French Army so I could use it for the earlier Italian Wars. I got as far as buying some Table Top Games figures many years ago and, a bit later, some from Gladiator (now Black Hat Miniatures) but never actually painted them. Partly I stopped because I wanted more variety of figures in the unit but then I dropped out of wargaming and they sat in a cupboard for a long time. When I re-started and decided to complete my small 16th C collection as an Italian Wars, French army for FOG-R, the problem of getting enough variety in the unit, whilst maintaining a reasonably homogenous look, remained. I bought various other crossbow-armed figures so I had the variety but several looked too early and every crossbow was different and incompatible and so they remained in the cupboard while I painted other units.

From left to right: TTG, Gladiator, Naismith, Naismith, Essex, 4 from Old Glory, 2 from Venexia


Now I have almost got a 900 point army finished, I just need 8-12 bases of Adventurier crossbowmen for my early army and 4 bases of mounted arquebus for my late option. Either will involve some substantial modification work so I have finally made a serious start.

From experience with my Swiss, Landsknechts and Gendarmes, I think quite large differences in figure size and style look OK as long as the weapons are fairly uniform. Achieving that was easy with pikes, quite easy with heavy lances but a bit more of a challenge with crossbows.

The cast crossbows vary in length from 9mm (Venexia) to 14 mm (TTG / Altuos) and in span from 8 mm (Venexia and Old Glory) to 11.5 mm (Essex). There is also a lot of variation in shape of the bow - whilst contemporary crossbows seem to be mostly thin steel, these were all quite think with the TTG bow apparently 1.2 mm in diameter - like a scaled down 5" fence post. Even worse, the Old Glory figures come with a solid mass of metal filling in between the bow and the string.

I decided to cut the longest bows down in length and replace all the actual bows with flattened, shaped (with a needle file) and bent pieces of 0.7 mm brass rod to give a pre-bend span of 8-9 mm. This isn't quite as fiddly as it sounds but it is much more of a faff than just replacing cast pikes.

After cutting the bows (and string and fill-in metal) of the first couple of Old Glory figures, I found I could get quite a reasonable effect by drilling out the filled-in area then cutting and filing away to just leave the thinned bow and the string. It isn't quite the same as the brass bows but I think it looks OK and matches in reasonably. It does raise the question though of whether I should string all the others.

The second issue is that some of the figures are very medieval looking. Also the hats on the Old Glory figures don't look very French to me.

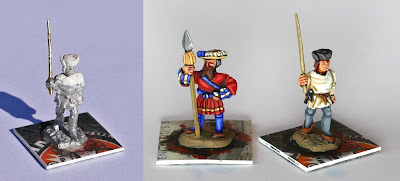
I have been following Stuart's blog about converting 28mm 15th Century figures to represent early 16th C French. Fantastic work with a lot of original research and far beyond my abilities but he shows how to put together some great French skirmishers with crossbows and arquebus and I decided to try something similar with these smaller scale figures. I have chosen what I think are the most suitable figures - 4 each of 6 different ones for my 12 bases - and started modifying them by filing and adding Milliput. There's a long way to go with this but I am quite encouraged so far.

This shows the brass replacement bow v cutting away on the Old Glory figures. The three OG  figures will get new hats made from Milliput, as I did with my French arquebusiers. The other three figure types I chose are the Venexia figure with a helmet, the Naismith figure winching and either one of the OG firing figures or the other Naismith figure or maybe two of each.


Monday, 4 January 2016

Swiss Arquebusiers

I finally finished the arquebusiers to screen my Swiss pike keil over the Christmas holidays, in time for a FOG-R game yesterday against a German States army. 


The figures are from Khurusan, the same as most of those in the keil. Like the other Khurusan figures, they are quite slender (or realistically proportioned, compared with the stocky cartoon figures from most other manufacturers) and well detailed but maybe not the easiest figures to paint. 


The Swiss banners are based on information from Massimo Predonzani’s book on the battle of CĂ©risoles. He states that by 1525 infantry flags were 3.7x2.8 m. On the basis that 15mm (in reality 16-18mm ground to head) is about 1:100 I tried 37x28 mm but that looked far too big. For the pike block I reduced the flags to about 24x32 but even that seems big - to the extent that they interfere with the pikes in the third rank. If I had realised before basing just how big they would be, I would maybe have used a double-depth base for the centre of the keil and put all the flags on that. I further reduced the flag for the Aquebusiers to 20x27 mm - it still looks big but is rather more manageable. 

The Swiss flags were drawn using the basic drawing tools in Microsoft Excel (not an obvious choice, but I use spreadsheets a lot for work and it was to hand) and printed out on an inkjet so it was easy to play around with sizes.


Does anybody have other information on likely flag size for the Swiss in the 1520s and 30s? 

Friday, 1 January 2016

New Year

The New Year seems a good time for taking stock and looking forward.

I finally have 800 points worth of Italian Wars French finished and just about enough scenery to give a reasonable covering on my new table, however I was a bit surprised how few actual figures I have painted.

Whole French army January 1st, 2015

Progress in 2015:
  • Swiss Pike Keil -  12 bases of pikes and 2 of heavy weapons
  • Swiss Arquebusiers - 6 bases of light foot
  • Mounted commander - Louis de Tremoille
  • Camp with two tents, an ox cart, two men and a dog
  • 6x4 board in two sections to fit over the dining table
  • Various terrain area markers
  • Rough ground markers
  • Vineyard
  • Fields
  • A large house and a row of houses (not quite finished)
Still to do:
  • 4 bases of LH arquebus
  • 2 or 3 more generals
  • 2 x 6 bases of LF crossbow Adventurers
  • 6 bases of MF arquebus Italians
  • 2 bases of LF arquebus Landsknechts
  • 2 or 3 x 4 bases of Gendarmes - I would like to go for a more historically accurate look for these. I was given a big print of the Ashmolean's Battle of Pavia for my birthday - no barber's poles there but quite a few ideas of contemporary colour schemes for the tunics and horse barding.
  • 4 bases of Archers (Heavy Armoured Lancers)
  • 8 bases of Reiter (to give me 2 units of 6)
  • More buildings, including a church and walled enclosures (I hesitate to call them gardens) to go with them
  • Steep hills and a couple more low hills
  • A marsh, a lake, more terrain areas
  • A more distinctively renaissance vineyard
  • Markers for brush and maybe more for rough ground - also need to settle on a  standard stone colour as I have ended up with two completely non-matching set of rough ground markers.
  • Cohesion markers - I have a plan involving small MDF disks, the cohesion state written in Milliput and a suitable visual indication - I'm thinking discarded weapons / wounded figure / Khurusan's Renaissance death figure for the three levels.
  • Another Landsknecht Keil and another Swiss Keil - this may have to wait a while before I can face painting any more tiny stripes!
I should be busy for a while yet!

Added as an edit on 2nd Jan:

One thing which has amazed me since starting this blog is the variety of countries from which people have viewed it: UK, USA (no surprise in those two), New Zealand, Italy, France, Ireland, Germany, Australia, Afghanistan, Iceland, Belgium, Spain, Russia, Chile, South Africa, Argentina, Namibia, Japan... I guess one of the great things of the internet is that it provides a way for people with a niche area of interest to exchange ideas, wherever they live. So thank you everybody who has bothered to take a look, a particular thanks to those who have left comments, and if you do happen to read this, it would be great to hear what projects you are 'working' on, or interests you are pursuing, that caused you to pass by here.

Happy New Year


Saturday, 12 December 2015

Scenery - Vineyards

Among the scenery types available to the Italian Wars French in FoG-R are vineyards.  I have seen a lot of good commercial and home-made vineyard strips but they all seem to depict modern-style vines, grown in perfect straight lines on wires strung between posts. I’m no expert but it seems unlikely to me that 100m rolls of galvanised wire would have been available in the 16th century so this approach doesn’t seem quite right.


I made some online searches to try to find illustrations or descriptions of pre-industrial age vineyards without success, although I’m sure somebody has studied this area and published their findings. Whilst on holiday this summer, I saw a number of small vineyards near Minerve in the South of France with individual vines grown as bushes, pruned to slightly elongated shapes and in rough rows but with no wires or stakes. That seemed a more likely model to me for how most vineyards would have looked during the Italian Wars, so I based my pieces on that.

The armatures for the bushes were made from some fairly thin (about 0.5mm) steel wire which I had lying around. I cut this to approximately 40 mm lengths and twisted them together in threes using a pair of pliers. For the first few, I just twisted the three together but these tended to fall apart so I started giving an extra couple of twists to two of the wires and this made them more secure and also, I think, gave a more realistic and interesting shape. I cut the ends to length so the short, equal ends provided the ‘roots’ and bent the ‘branches’ to a suitably convoluted shape. I then covered the twists of the trunk with Araldite.  


Most vineyard bases seems to be made on lolly / painting sticks but I wanted something a bit heavier and more stable so I cut strips from the same offcuts of Amtico which I used for the broken ground markers. This time I chamfered the edges so they would blend in with the bases a bit better. I glued the armatures on with hot glue - I’m not very used to using this and didn’t make a very neat job of it as can be seen in the photo.


I built the base up using flexible decorator’s caulk, the same as for my fields, with grit and sand stuck to this with PVA and painted in my usual way. The armatures were then painted with Vallejo German Cam Brown and dry-bushed with the same colour mixed with white. 


The foliage was made from woodland scenics clumping foliage. The basic clumps were far too big for these little bushes so I cut some of them down with a kitchen blender. I glued them on with hot glue - this was suitably tacky and built up well over the armature but it was very stringy and showed through the clumps in a few places as noticeably high-gloss areas. Maybe somebody can suggest a better choice in future? After the glue was set, I used tweezers to remove excess clumps and the strings of glue - looking at the photos, I missed a few strings.

To hold the clumps together and make it all more robust, I soaked the clumps with dilute PVA and tried to shape them to cover the bare patches of glossy hot glue. When that was all dry, I painted the remaining visibly gloss bits of hot glue with dark green paint, creating the problem of different greens so I dry brushed with progressively lighter greens to get a uniform effect.


Sunday, 29 November 2015

Paint for scenery

I mentioned in an earlier scenery post that I used Humbrol enamel 29 dark earth as the base coat for figure bases with Plaka yellow ochre straight from the jar and then mixed with increasing quantities of Vallejo white as dry bushed hi-lights.

When I started making the scenery shown on this blog, I wanted to use cheaper and higher volume alternatives. Yellow ochre and white were easy - I just bought relatively cheap DecoArt craft acrylic paint from Hobbycraft.

My first try at the dark earth replacement was a match pot of Homebase brown emulsion with various dark browns and greens mixed in to give a close match. That worked very well but was soon used up so I took the plunge and decided to use the Dulux colour matching system to buy a litre to an exact match. I painted a patch of Humbrol onto a sheet of card to use as a reference. Disappointingly the colour that came out (Beaver 08B25, which, oddly, does not feature on the Dulux website) proved not to be a very good match at all - too pale and grey. To compound my annoyance, Homebase insisted there were no returns allowed on mix to order paint.

Having spent the money and having no return option, I decided to try it anyway and to my surprise, once the thick dry-brushing of yellow ochre was done and the subsequent hi-lights, the finished effect was quite indistinguishable, to me, from the bases using Humbrol dark earth or the earlier scenery pieces with my hand-mixed match pot. 


Looking on the Dulux website, it looks as though there are a couple of better matches - Rich Praline 2 and Earth Glaze 1 but I guess any of the earthy medium-dark browns would work equally well.

Friday, 20 November 2015

16th Century camp for FOG-R


It has taken me a long time to find a satisfactory combination of models and an arrangement for this camp: I bought the first tent at Sheffield Tripples in March 2014 and I finished the flags last night.

There are many 16th century paintings and tapestries showing camps, including the French camp at Pavia. These show the typical medieval jousting tents and pavilions with multiple flags and banners so that set the basic requirement. I decided early on that I wanted two tents, a central flagpole and some other feature so bought a couple of circular tents by Bauda then an ox cart, pack horse and some barrels, sacks, a crate and a chest from Donnington. 

When I tried to arrange these on a 120x80 mm base, two circular tents just didn’t look right so I eventually bought Bauda’s ‘King’s Pavilion’ to use with one of the round tents, the ox cart and various baggage to give a better composition. 

The next problem was finding suitable figures to populate the camp and to give a sense activity. Whilst there are lots of purpose-made sets of 15 mm ancient and medieval camp inhabitants, there are none for the Italian Wars. The nearest civilian figures I could find were in the Minifigs Hussite range but these too are very medieval looking. One idea was to use artillery crew - I have a couple of Minifigs figures, carrying a buckets which would have been suitable but I needed these as artillery crew. 

In the end I settled on just two figures. One was a medieval Donnington New Era horse handler figure (CB06) which I had bought along with the cart and pack horse. His most medieval feature was a hood and coif so I filed these off and gave him a 16th century hair style and hat from Milliput and a staff made from brass wire. So this would look more like a staff and less like a piece of wire, I filed it to a taper, added a few dents and lumps and bent it to be very slightly crooked. The second figure is a Freikorps Landsknecht provost. I have a couple of these from command packs and didn’t really know what to do with them - nice figures but un-armoured and not really right for the front rank of a pike keil. The only negative issue with these figures was that the partisan was poorly cast with a very thin shaft (actually with gaps in the casting) and a very thick blade - the overall effect was like a rugby ball balanced on a length of garden hose. I wanted to keep the cast tassel below the blade so I cut the head off, filed it down to a much thinner section and stuck it back on a 0.7 mm wire shaft. 


Once the various elements were gathered together another problem emerged - the tents looked far too small compared to the ox, ox cart and figures. Obviously this is deliberate to keep them within DBA/DBM base sizes without making them excessively tall and thin. To disguise this slightly and add some more interest to the base, I built up the areas around and immediately under the tents with thick card and a 40 mm round MDF base, leaving the ox cart and driver on the lowest level and the guard one level below the tents. This added 4-5 mm and avoided the cart sides being above the edge of the round tent’s roof.

This shows the first layer of card and the MDF circle below the round tent. I later added another layer of card below the pavilion, cut to the exact footprint. I glued the two figures, the dox and ox in place and smoothed out the steps and disguised the bases with filler. The tents and cart were glued in place after texturing and painting the base but before adding static grass and tufts.
I had long admired Simon Chick’s Burgundian blog, particularly some of the incidental details like a cat raiding the camp supplies and his specially commissioned medieval hounds. So I thought a dog and/or cat would add a bit of interest to my 15mm camp. I couldn’t find a suitable cat but Minifigs make a dog, bundled in with cows or sheep, which looked OK. I had three goes at painting him and am still not really happy with the result - a sandy coloured dog against sandy coloured ground and a sandy-yellow tent wasn’t a great idea!


I placed the Landsknecht as though guarding the King’s pavilion and challenging the approaching ox-cart handler, with the dog coming round the end of the tent to see what was going on.

The final element was to add some flags. I made a big flagpole with the baggage piled up around it and a small flagpole topping the round tent. As with most of my figures, the flag staffs are made from tube on a wire core with the flag mounted on a separate piece of tube so they can easily be removed and swapped to allow the more generic units to serve in other armies. The flags themselves were drawn in Microsoft Excel and printed on an inkjet, as with my Swiss pike keil.


As ever, I would be grateful for any comments or suggestions. One of my main reasons for starting this blog was to try to pick up tips for improvement in my painting.


Friday, 13 November 2015

Scenery - hills and buildings

Hills.


It is difficult to make war-games hills look convincing. Part of the problem is that real hills tend to be big and complex in shape but war-games hills are small ovals. In the case of FOG-R in 15mm, particularly small: a maximum of 12” diameter for a standard terrain feature and 16” for a large one, so no long ridge lines or bluffs filling half the table. The other problem is making them with slopes shallow enough so the figures don’t topple over but with enough height that they look like hills. 

So far I have made a few low hills with shallow, smooth, uniform slopes. They are made from MDF, cut to the outline shape with a jigsaw and then shaped with a power planer. ( A big warning here: any wood dust is hazardous and there are suggestions the resins in MDF may be particularly bad. I did this outside wearing a proper respirator mask and even then the mess it made of the driveway makes me reluctant to make any more hills this way.)  For the double-thickness hills, I used repair plaster to smooth out the join. After sanding, I used the same finishing process as for the area pieces: PVA glue and sand, paint dark earth, dry-brush yellow ochre then yellow ochre mixed with increasing amounts of white and finally glue on some static grass. 


If I was doing this again, I think I could use thin mdd as a base and then craft foam to build up the height - the only problem with that is that it seems difficult to buy high/medium density foam in less than industrial quantities.

I have plans for some high hills and maybe a hilltop village. I have bought a small sheet of Celotex insulation foam for that. It seems very crumbly but I plan to use quite a lot of plaster and PVA to build up a more complicated shape, add texture and (I hope) make it more robust. We'll see how that goes.

Houses.


I decided to go for a generic southern European style that would work for anything from medieval to WW2 in Italy and the south of France. The first thing I think of with village and small-town buildings in these areas is a jumble of pantile roofs. I have since learnt that the typical cylindrical section tiles are actually called barrel or mission tiles. I started with a good selection of reference photos to try to make sure the overall effect was correct. 

Finding pantile / barrel tile textured roofing sheet was not so easy. The sheets made by Slaters didn’t look very convincing so I bought some Wills SSMP206 Pantiles from AGR Model Railways off Ebay. These are very clearly classic S-shaped pantiles and rather oversize for 15mm but I think the effect is good. I have now seen some other options that might look even better but without a ready source in the UK. I spent a long time thinking about how to make the ridge tiles. The best method I could think of was a bamboo skewer shaped with a V-section on one side to fit in the gap between the top edges of the roof sheets. I then held it in a modellers mitre saw box and made cuts through the curved edge to represent the joints between the ridge tiles.

This roofscape is actually Aigues-Mortes in the South of France but shows the type and mix of colours I was aiming for.
Most of the war-games model buildings I see have open shutters. This seems unlikely to me - for one thing, assuming the battle is being fought in the Mediterranean summer, in day time, they would probably be shut to keep the heat out. Another reason is that, if a load of Landsknechts, Swiss and Stradiots were going to pass near my house, I’d make sure the doors and shutters were closed and barred, any valuables, wine or food well hidden and my daughters staying with relatives in the next town! 

The structure of the building was made from picture mount card - although this is a bit thin (use a double thickness for visible walls), it cuts very cleanly and glues together well with PVA. With extra PVA to reinforce the edges and joins, the completed building is very strong and reasonably robust. 

I added stonework detail on corners, around doors and windows and to break up large plain sections using old business cards cut into thin strips and then chopped into squares and rectangles. The doors and shutters were made from slightly thicker card, scored to give a plank effect and then with addition thin card glued over the top on the doors for the rails and stiles.

Once the construction was finished, the cardboard parts were given a wash of dilute PVA for strength and then, avoiding the wooden parts, PVA and DIY filler (Tetrion or similar) to soften the edges and add a bit of texture. The stonework was painted with cheap DecoArt acrylic craft paints - Country maple as a base then dry-bushed with sandstone and sandstone and white. I also used some brown washes for the darker shadows. The doors were painted separately then glued in place.

For the roof, the first stage was to give it a coat of Sandtex fine textured masonry paint in terracotta. I bought a match pot of this many years ago and it should be enough for my modelling career. My reference photos show old roofs with quite a lot of colour variation from tile to tile. The first step was to enlist the help of my 11 year old daughter to paint a lot of individual tiles in a random pattern. We chose six or seven different darker browns and greens and she painted 10-20 tiles, randomly scattered on each side in each colour. Once this was completely dry I gave it a wash of dark brown then dry brushed with terracotta and then light-stone hi-lights.


One thing I don’t like with this first model is that the stonework detail looks too uniform. I made the mistake of making the blocks all the same height - maybe not so bad for a higher status building but less likely on a village house. For the next group of buildings - a row of smaller houses - I have cut strips to various heights and mixed them up a bit. 


I plan to make another two or three building groups, maybe including a church, and some walled areas to create a little village. As with the other area scenery, I’ll make a suitably textured base and move the building groups out of the way to allow for figure movement.