|
The British Army in the Normandy Campaign 1944. © IWM (B 5990) |
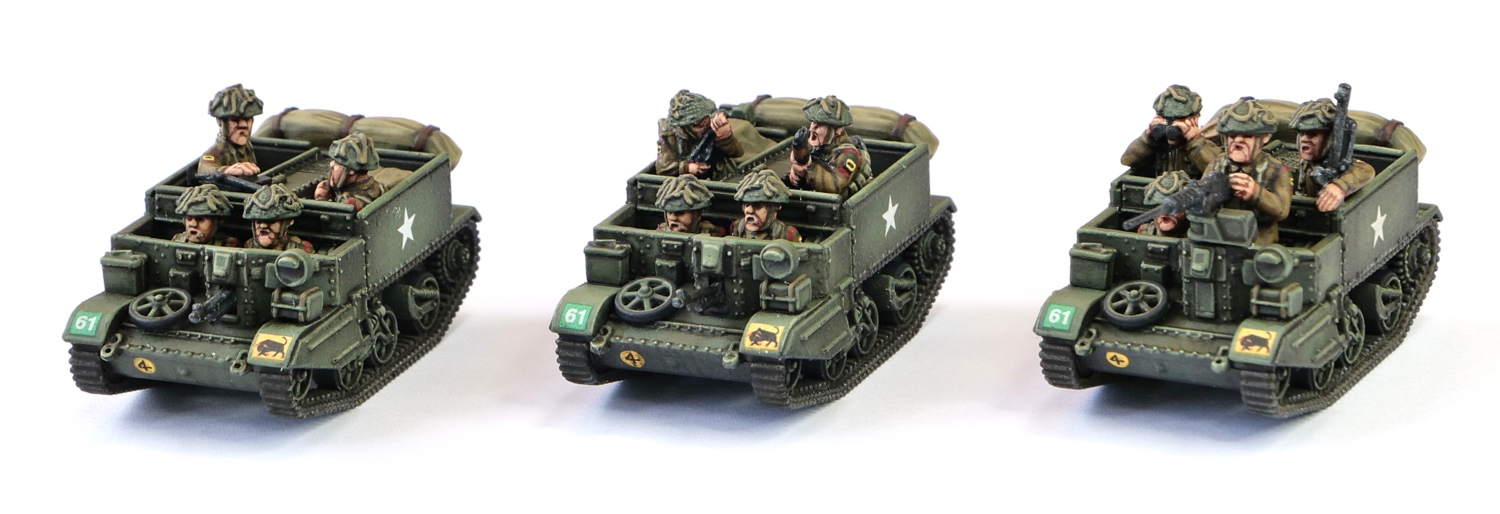
The Carrier Platoon was a unique feature of British infantry battalions of the Second World War, combining high mobility and firepower. Although classed as a platoon, everything about it was more generously specified than for a regular rifle platoon. By the time of the Normandy landings, it comprised more than sixty people and was commanded by a Captain with four sections, each led by a Sergeant. Equipment included thirteen Bren Guns, four 2" Mortars, four PIATs, a No.18 Radio and, most importantly, thirteen Universal Carriers. That's more machine guns and support weapons than a contemporary infantry company.
Quartermaster Section - Carrier Platoon 1944
Bayonet Strength - British Infantry Battalion from 19 May 1943
Although these references state one No. 18 Radio for the Platoon HQ, there are multiple occasions in an account of carrier platoon operations 'From Normandy to Holland' under the BBC's People's War archive where a section leader recalls using the radio, including one where he writes: "I radioed my Platoon HQ", so it isn't just that he happened to have the platoons sole radio. That each section would have been equipped with a radio, by this stage of the war, makes a lot of sense as it would have permitted more dispersed operations whilst maintaining communication. Interestingly the same account often describes the section operating independently or being attached to an infantry company to provide extra fire support.
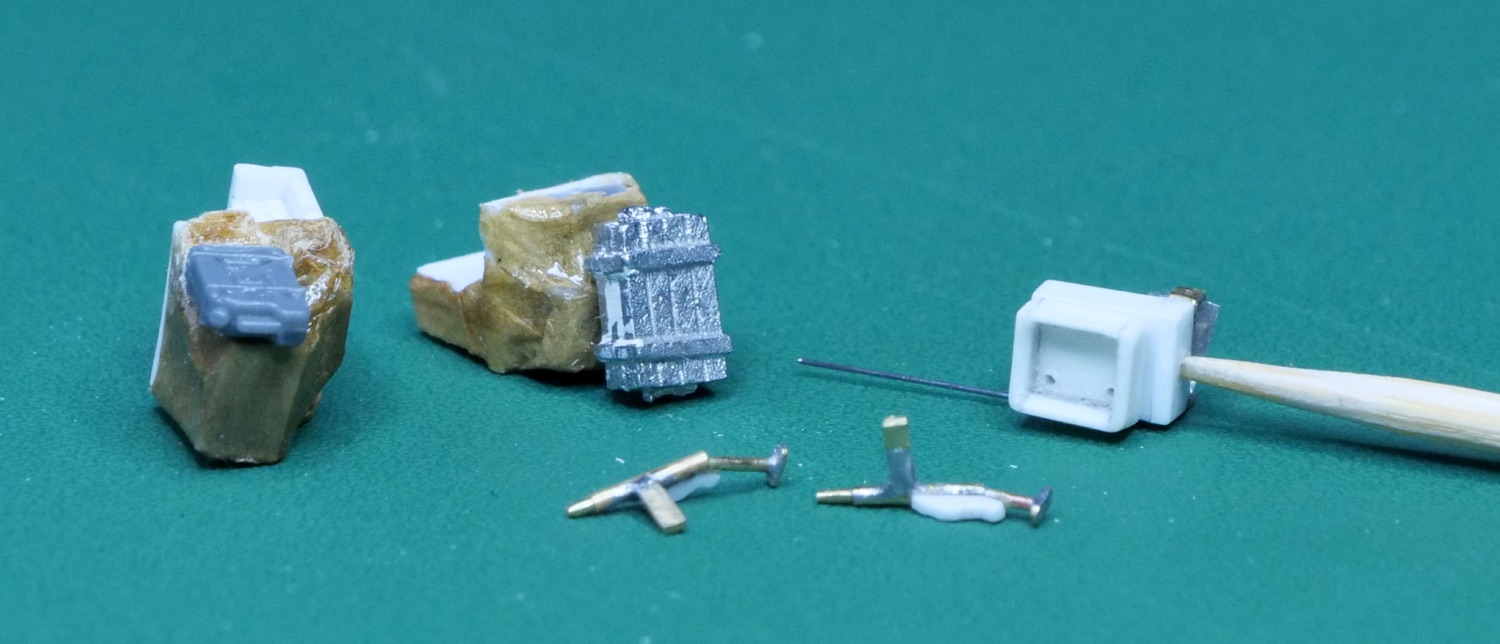
Although I have bought multiple Universal Carriers of different makes, I have held off from making a table-top version until now because I was unable to find satisfactory figures for the crew. Most of my Second World War figures are from Peter Pig but, although I bought a few of their vehicles, I never found them satisfactory - a bit too bulky and lacking in detail - so I have mostly used Skytrex and latterly Plastic Soldier Co. I actually bought eight Skytrex Universal Carriers and a pack of crew. Unfortunately the Carriers are huge and the crew figures are just normal infantry snipped off just below the waist. They have considerable flash and are lacking in detail as well as legs. I tried several times to put them together but the results just never looked right. Peter Pig offer Universal Carriers with integral crew moulded in but these look extremely blobby and soft on detail. There would also be a problem getting variety in the platoon.
I was pleased then to get a box of Plastic Soldier Co. Universal Carriers. The box has no fewer than nine carriers, each with eleven potential crew figures. The box picture even has an encouraging picture of an 11 Armoured Division, Motor Battalion carrier with the crew wearing camouflaged helmets and armed with rifles and a Bren gun. Problem solved! Sadly not - the crew figures bore no relationship to the box art. Apart from those firing the 50 cal, Vickers machine gun or mortar, they are unarmed and look very relaxed - more like they are going for a ride in the country than into battle. There are no rifles or Sten guns included and the helmets are early war and free of netting and scrim. Most peculiarly the provided Bren gun bipod is too wide to fit through the firing port and there isn't enough space lengthways between the gunner and port. So they languished in the stash for a long time as I painted other things. Now however, I have all the other elements that I need for an 'O' Group British Infantry Battalion, I can't put this off any longer.
In 'O' Group, the Carrier Platoon is represented by a normal 3-section infantry platoon plus a PIAT section with three carriers provided as transport. This seems to me to be selling the unit rather short in terms of strength and firepower but I will use this as a start and see how we get on. I can imagine adding a fourth section and applying the close range firepower bonus that is used for German Panzer Grenadiers - three Brens and 2" mortar v two MG42s seems reasonable - and close combat disadvantage to reflect the smaller number of riflemen.
For the dismounted platoon, I will be using Peter Pig figures but with prone and kneeling poses to distinguish it from the normal platoons. I will also include a 2" Mortar or PIAT on the section bases.
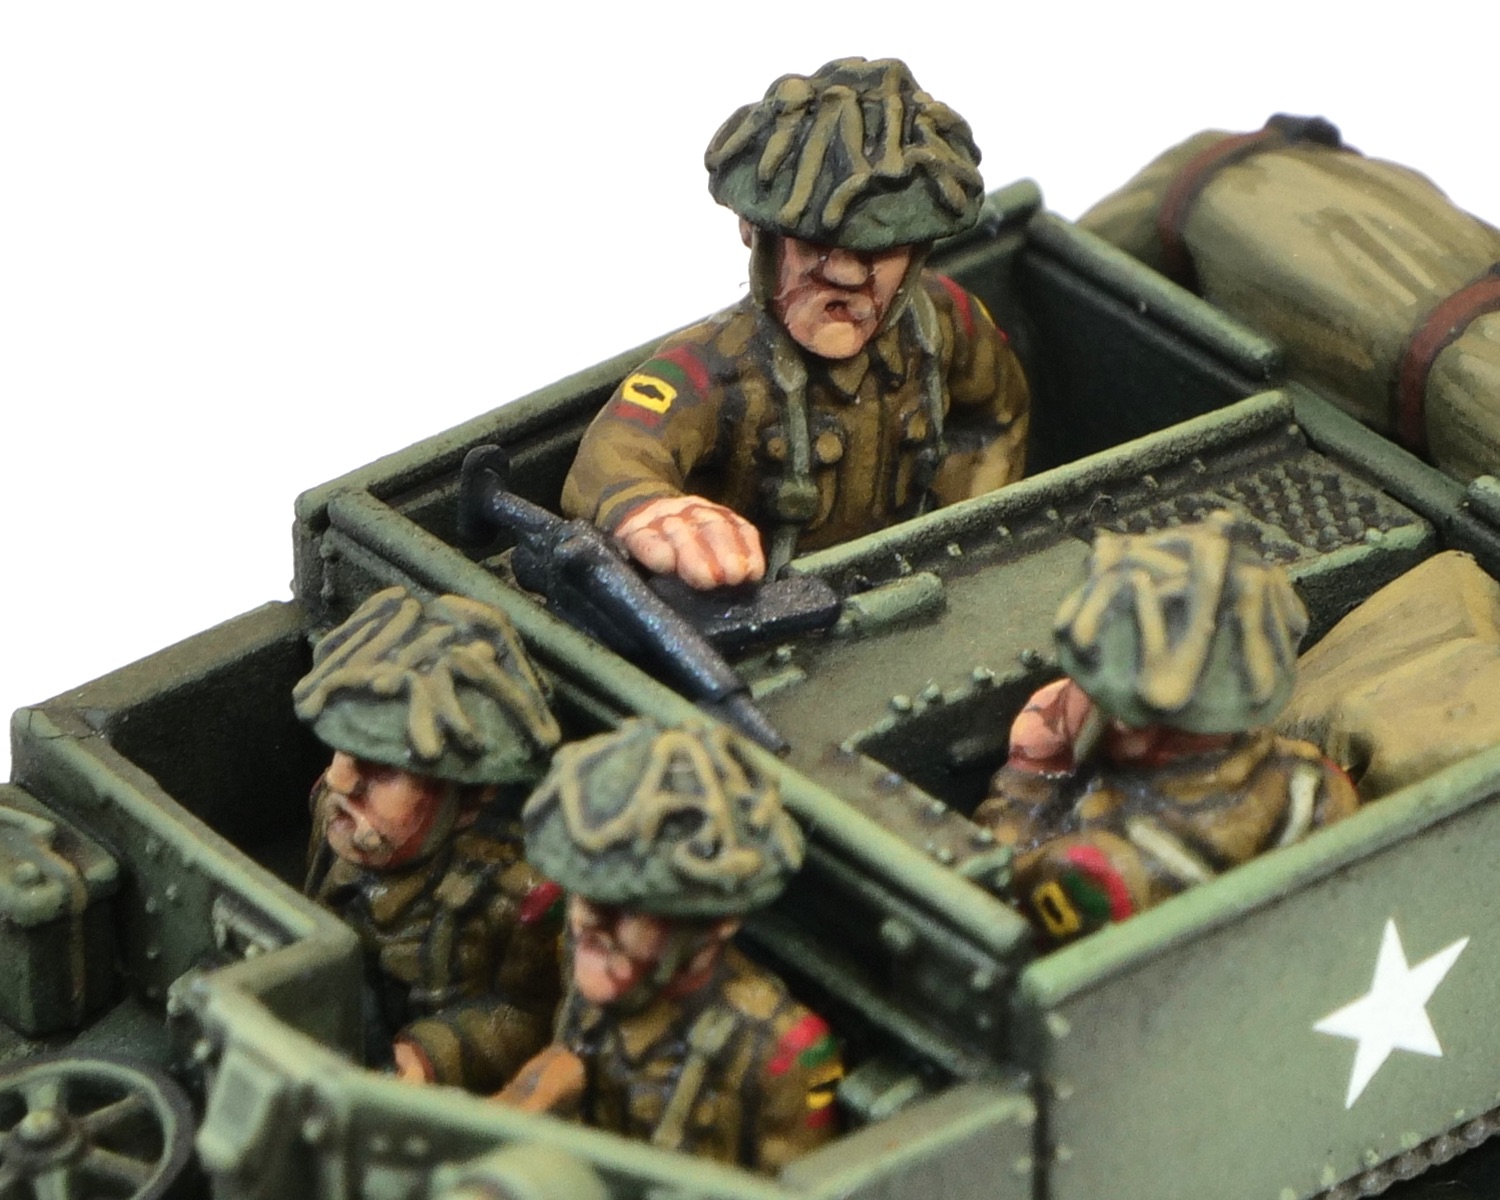
For the mounted platoon, I'm mostly using the Plastic Soldier Co. figures but with Peter Pig late war British heads and some heavy modifications to the poses, including cutting and re-attaching hands and arms. In one case I've swapped the upper body for a Skytrex figure with a Sten and also using a Peter Pig seated figure and one of their light order riflemen.
As I mentioned there are no rifles or Sten guns included. Scratch building SMLEs seemed a bit too ambitious so I made a couple of rather basic looking Stens from brass tube and wire and a bit of plastic. This is easier than it sounds and only requires five pieces and two soldiered joints - the magazine at right angles to a length of tube and the shoulder rest at right angles to a length of 0.5 mm rod to represent the barrel and butt.
I also made some stowage with blocks of plastic under superglue-soaked tissue then a jerry can or wooden crate or ammo box glued on top. On the right is a spare No.18 radio set from making my battalion HQ.
In the interest of getting an 'O' Group Carrier Platoon on the table as soon as possible, I decided to just complete three carriers as a priority then get the dismounted troops done with empty carriers and a fourth mounted one to follow later.
One thing that caused me some delay was the decals for the arm of service signs. I belatedly realised that the sheets I had from Skytrex didn't include the infantry brigade signs. Rather than doing the obvious and ordering the sheet that did, I ordered the full 11th Armoured Division decal pack from Plastic Soldier, only to find that this also lacked the arm of service signs for the infantry brigade so I ordered again from Skytrex.
Skytrex don't offer bridge signs, so these are done by hand. After a bit of trial and error, I cut the tip off a cocktail stick and used that to dab a bit of white paint on at a time to make a circle of the correct diameter then repeated the process with yellow over the top - yellow just doesn't cover well enough on its own. The numbers were added with a 0.1mm Staedtler pigment ink pen.
So far the models are free-standing. I generally don't like bases for vehicles but I'm undecided on these - they are very small and magnetic bases would solve the problem of transporting them without risking damage and they could also go in the same box as the rest of the battalion.
 |
| Despite what I wrote earlier about these definitely not being little proto-IFVs, the chap with the 50 cal doesn't seem to have got the memo. One question this picture raises is how the bullets are supposed to get from the closed ammunition box into the gun - must do something about that! |
 |
| This shows one of the scratch-built Sten guns, carefully positioned so you can't see that it has no trigger. Even so, from what I've read about their tendency for accidental discharge when knocked, if I was the chap sitting opposite, I would be nervous. |


_Insignia.jpg)