Sunday 4 December 2022

More Shermans - B Squadron, 3 RTR Complete

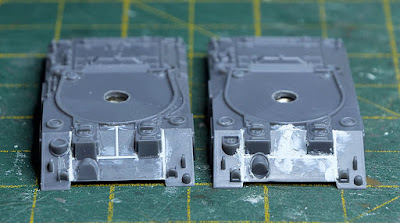
These three PSC 15mm Shermans and Peter Pig tank commander complete my scaled down squadron of three troops of three tanks each plus an extra 75mm Sherman to represent the squadron HQ. I have a couple of PSC models left over and one Skytrex Sherman V painted in my earlier dry-brushing style. I'll probably complete these at some point to replace the bodged hybrid PSC/Skytrex model or give a fourth troop but that's a very low priority.

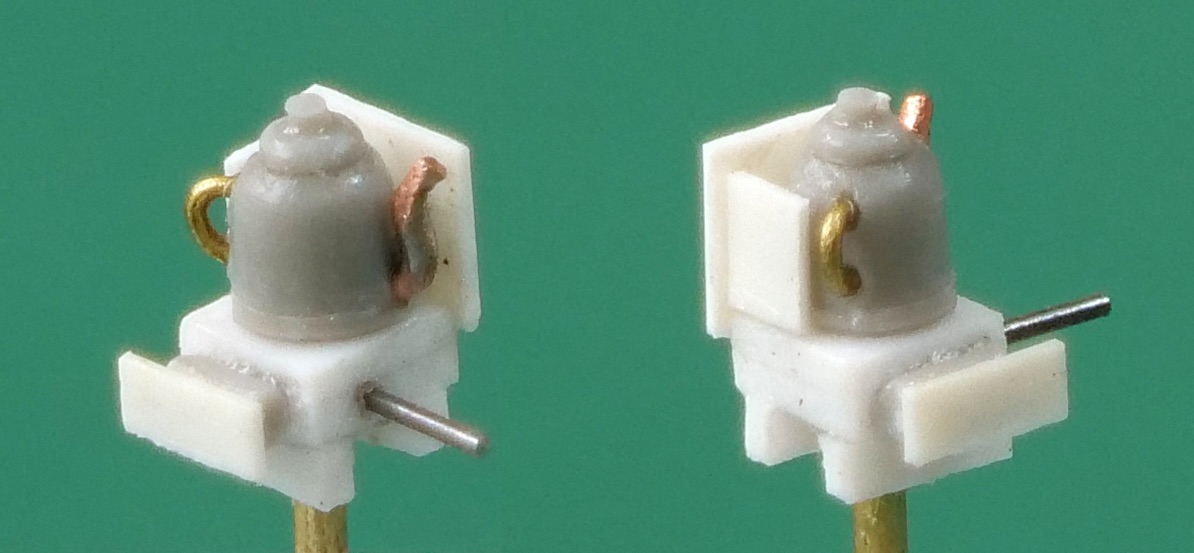
As I post this, I realise I have missed off the aerials, although the holes or all drilled ready so I'll have to add those at some point. 


The painting technique is the same as with the previous ones - airbrushed with successively lighter shades of SCC15 with exaggerated contrasts and the details and final hi-lights by brush then brought together with a filter and pin wash, as described by RubĂ©n Torregrosa on his Heresy Brush blog. However I skipped the chipping, streaking and mud stages as I wanted a cleaner look and feel that, at this small scale, it is easy to lose the detail and even the overall look of the vehicle. 

Another difference was that I used Vallejo paints, with a base SCC15 mix of 1 part 888 Olive Grey to 1 part 924 Russian Uniform. My shade colour was the 1 part SCC15 mix to 1 part black and the airbrushed first hi-light 3 parts SCC15 to 1 part 976 Buff. The top (brushed) hi-light was roughly 1 part SCC15 to 1 part buff. 


With a growing collection of vehicles finished, I needed somewhere to store them. My infantry are in the ubiquitous Really Useful Boxes, 4 litre size with two shallow MDF trays from Warbases. to save space. All my infantry bases are magnetised but I prefer vehicles, at least the larger ones, un-based needed some other solution to stop them moving about and getting damaged. My solution was to buy some 20mm upholstery foam from Dunelm. One £5 piece is enough for three boxes, which should be plenty for all my WW2 vehicle storage. I marked it up with a soft pencil and made the cuts with a new craft knife blade. 

Actually 20mm was too thick - 1/2" or 15mm would have been perfect - but, despite looking for a long time, it was the best I could find without buying huge quantities. The main problem is that the gun barrels on tanks like the Firefly, that overhang the hull, sit lower than 20mm off the ground. My rather awkward solution was to cut the cutouts in half across their depth. 


Monday 24 October 2022

British Battalion HQ, Normandy 1944


I wanted to make a small diorama for my 4 KSLI Battalion HQ in Normandy, 1944. In line with the the pattern established by my platoon and company bases, it would be a round base and, going up another step in size,  60 mm diameter with 5 figures to represent Lt. Colonel Miles, Major Robinson and some immediate support staff. A fairly static grouping, as though they were monitoring the battle and considering what to do seemed appropriate but this is difficult with the late war British Peter Pig figures, as they tend to be in quite dynamic poses.

Battalion HQ would obviously have a radio (more than one really but compromise is needed with only 5 figures). The Peter Pig radiomen models are either walking about carrying the radio or lying prone as though seeking cover - great for mobile a company command or a forward observer base but not so good here so I scratch-built a Wireless Set No. 18 from plastic, wire and some aluminium foil and chose a kneeling gun crew figure as the operator.


Having watched several 1970s war films, especially 'A Bridge Too Far', I learnt that the British Army spends all its time drinking tea rather than showing any sense of urgency or fighting. For Lt. Colonel Miles, I chose a figure in a peaked cap from Peter Pig's British drinking tea pack of figures with another as a guard to stand at the edge of the group. That tea had to come from somewhere so I also scratch built a No.12 camp stove with a kettle sitting on it and a seated crew figure from Plastic Soldier's Universal Carrier to watch over it. Obviously considerable simplification was needed as the stove base is only 2.8 mm square but I hope it is still recognisable. 

For the German HQ, I'm thinking eating wurst and drinking weissbier!


I completed the group with a parked jeep (also from Peter Pig) and a standing officer to represent Major Robinson, the battalion 2.I.C.


As mentioned above, the idea was to keep with the theme of my platoon and company command bases but show a clear step up.


Friday 1 July 2022

Painter's block unblocked.


I started these back in  April but have been struggling to focus on getting them completed. Part of the problem, I think, I that I have too many half-completed jobs on the go at one: two batches of British infantry, some half-painted vehicles and some part-assembled carriers. It just makes it too easy to go off and do something else - displacement activity rather than real progress. Eventually though, I did get my act together and finish them.

I've decided the first priority is to get the minimum bases for a full British battalion for 'O' Group. This means three company HQ bases and 9 platoons (so 27 infantry bases) plus a carrier platoon, a FOO (or two), 6 pdrs and AFV support. With this batch, I have the company HQs and just enough infantry bases for the 9 rifle platoons (lets just assume that one of the four rifle companies is left out of battle and accept using PIAT or 2" mortar bases to make up the numbers as well as using my earlier figures based up for 'Overlord') and plenty of support but no carrier platoon. 

This is my first British platoon fully painted to my latest standard. Eventually, I'll have 6 of these plus the carrier platoon. Later I'll add the platoon commanders, PIATS and 2" mortars but, as these aren't needed for 'O' Group, they can be a second priority for now.


I've now got my 3 company command groups. I've decided to have round bases for all my commanders: 30mm dia for platoons, 40mm dia with three figures for company and 60mm for battalion. 


As previously mentioned, my British force is meant to represent 4th King's Shropshire Light Infantry and supports (mainly 3 RTR) from 11th Armoured Division. This choice was partly based on a visit to Shrewsbury castle, when I lived nearby, and the purchase of an account of the battalion's experiences in Normandy written by Ned Thornburn who had commanded D company. His book included a list of all the officers at the start of the Normandy battle so I decided to use that list for my command bases. It seems rude to not have Ned represented on the tabletop so it will be C company that is left out of battle / in reserve for my force.


By the way, apart from the last photo of the name labels, I used in-camera focus stacking for these pictures for the first time. I'm not sure I like the effect - there are some strange artefacts around some figures and it just looks a bit unnatural. Maybe this is just a matter of understanding the mode better and changing some details of the settings but at the moment I'm thinking I will revert to normal single shots next time!


Monday 25 April 2022

Marker tokens for 'O' Group


'O' Group requires a number of different tokens: Combat Patrols for each side, different levels of shock (the mechanism used to represent casualties and morale), orders and something to denote a hesitate company or a company commander who has been suppressed by enemy action.

As with most rule sets you can buy these but it is quite easy to make your own, assuming you have access to a printer and some software to layout clipped images and create text boxes. I used Microsoft Excel which, I suppose, shows familiarity is more important than whether the software was actually intended for the job.

Patrol markers are used for semi-hidden movement and create uncertainty and the fog of war. For these I just found suitable images online of the Allied recognition star and German Iron Cross then cleaned them up in photo-editing software and clipped them into squares suitable to print at about an inch across. The Russian star was drawn in Excel. One thing I found was that a square on the spreadsheet actually printed slightly flattened out so I had to elongate them to get a square print - I don't know whether that's a quirk of my computer, Excel or my printer but once you know it is there, it is fairly simple to fix.

You can see, in the screenshot below, that I did two sets side by side - one set with dividing lines and one without. When I have previously made tokens, I made them single-sided which leads to the time wasting chore of turning them right side up to see what is what. This time I decided to make them double sided. I just printed them out onto A4 paper (photo paper for the stars and crosses), cut round the large blocks of front and back tokens then spray glued the front set onto some card, cut round the outside then glued the reverse side, taking care to get the alignment as good as I could. The idea is to separate the individual tokens by cutting through from the side with lines so any slight out of register on the reverse side won't show up so much. 

For the other tokens, I tried to use colours to group like tokens together and show the escalating seriousness of accumulated shock. Whilst I like the idea of unobtrusive or minimal token, at this stage of learning a game, I find having them pretty obvious and incorporating reminders, like 2 shock - hesitant and 3 shock = suppressed is helpful. Maybe with greater familiarity we can swap to something that looks nicer on the table.


In the meantime though, this gives a functional set of tokens and markers and, if greater experience shows they need tweaking, it will be easy to make changes.


Wednesday 20 April 2022

Burning vehicle markers

Rather too much fire and not enough smoke on this one. 
Easily fixed next time I have my airbrush out.

I have been meaning to make some burning vehicle markers for some time and finally got round to it over Easter. 

The first step was to look at some online photos for burning tanks. The general pattern seemed to be lots of billowing black smoke; the lower part very turbulent, almost bubbling, and red-yellow fire showing through the smoke.

Some while ago I received a parcel that was packed with a large piece of synthetic wadding. I used some of it to make smokescreen markers and put the rest aside in my hoard of potentially useful things. 

I made two types of markers - some free-standing ones with weighted bases and some others to tuck under tank turrets. For both I glued the wadding to the base and teased it up into the rough shape of smoke rising from a fire.

After a bit of trial and error the process I settled on was to start by painting the lower part of the 'fire' red (cheap acrylic hobby paint). This left bits of white wadding showing through but as it dried it gave some stiffness and texture. 

I then airbrushed more red (watered down Vallejo) to give a uniform coverage. Airbrushing alone left the wadding too fluffy and the subsequent dry-brushing stages didn't work. I then dry brushed over the red with bright orange and then yellow. This left the top part just airbrushed or completely unpainted.

The final stage was to airbrush the top 'smoke', around the base and some lines swirling up through the fires in black. The overall effect is OK, I think, especially as they were quite quick to make and cost almost nothing.


Monday 21 March 2022

Normandy back gardens

When I painted the first row of buildings for my Normandy 1944 collection, back in 2018, I wrote that I didn't like that they just sat on the table with none of the things that surround real buildings. I actually started to do something about that soon after but I stalled on how best to do some of the details and the gardens / pavement base sat half-finished in the cupboard for a long time.

The base itself is a piece of MDF with cardboard and filler to compensate for the extremely uneven base of the the resin buildings. I added 'paving slabs' from thin card and made the walls from more MDF with cardboard coping stones. 


I wanted to depict rendered walls with the rendering breaking away in a few small areas. In a break from my previous practice of sticking on rectangles of card to give a brick or stone effect, I dug out small areas of the MDF, filled them with Milliput in which I sculpted the bricks, rendering over the rest of the wall with filler.

Fences and gates are made from 0.5mm plastic with the details scribed in and brushed over with a wire brush to remove the burrs and give a light texture. It turned out that this wasn't enough texture for dry-brushing to work when I came to do the painting and I had to revert to painting them in layers with a fine brush then a final dry-brush along the edges for a top hi-light.

I wanted to include some details that you might expect to see in 1940s wartime, to bring the scene to life. I assume, as in the UK, many people would be trying to supplement their food supplies by growing a few vegetables, keeping chickens or even a pig so I decided to depict these which would require (apart from a pig and some chickens) a chicken coop and pig stye. These aren't based on research into what was actual French practice at that time - just on what looked 'right'. 

I wanted to divide the back gardens with wooden fences but some of these Hovels houses are very narrow so the back gardens would be equally narrow - narrower than my infantry section bases.

This is up one of the perpetual dilemmas of Wargames scenery - including too many details makes them less usable as a game backdrop by making it hard to actually place figures in and among the scenery. 

I also found a (sort of) real-world problem with the pig-stye. To make a lean-to structure against the walls, with a front sufficiently high for a crouching pig-owner to enter required a shallow roof - too shallow for tiles or slates. An obvious solution would be corrugated iron but I was reluctant to buy a whole sheet of Wills or Slaters textured plastic sheet for less than a square inch of roof.

So my progress stalled with the twin problems of gaming usability and making or re-purposing something to represent 1/100 scale corrugated iron.

Eventually I decided to make the main details, including one of the boundary fences as separate pieces that could be moved out of the way when necessary..


The chickens are from Peter Pig. The chicken coop was scratch built from plasticard with sandpaper to represent roofing felt and I made the bucket from an off cut of plastic sprue with a wire handle.

The pig is (appropriately) from Peter Pig, from the same pack as the ones I used in my orchard. I suppose the pig should be fairly covered in mud but I was aiming for eye catching colour contrasts rather than genuine realism. He is probably feeling rather aggrieved as I have failed to provide any drinking water and his food trough is empty. 

I came up with a way of making a representation of corrugated iron sheeting by using the cat's flea comb in a metal-working vice to press the corrugations into pieces of thick aluminium foil cut from a tomato puree tube. 

Originally I was going to do a green house but that proved quite difficult as I didn't have any suitable clear plastic so the third garden had to settle for a cold frame and a couple of raised beds. I'd intended to have some beans growing up the canes but haven't been able to think of a good way of doing that so far. The canes themselves are thin steel wire, with the upright pairs soldered at the top with the cross-piece just glued in place.


I'm pleased with the overall effect and plan more of these extra bits of detail scenery in future. Maybe a  war memorial, roadside calvary, farm cart - that sort of thing. And a green house when I find some suitable clear plastic. 


Friday 4 February 2022

Early Medieval Houses

Having painted a 4th-5th century Roman Army, I thought I should have some buildings to represent the type of small Germanic settlement along the Rhine or Danube that they might encounter. In an earlier period I suppose the classic Iron Age round houses would have been appropriate but, from what I've read, these went out of use before this period, being mostly replaced by ridged long houses. Without going into a great deal of research, I assume these would be much the same as those used through the Saxon-Viking period in the British Isles. Peter Pig have a nice and modestly priced selection of these so I ordered a pack of three 'poor houses' and a 'small hall'. Although the hall looks a bit too English half-timbered to my eyes, my thinking is that these will also be generally suitable for use with any 'Dark Ages' Northern European scenario.

The 'poor houses' basically looked like a thatched ridge tent and differed only on that one of them had what I assume represents a fire wood pile with the wood laid horizontally whilst the others had bigger pieces of timber resting vertically against the back wall. The door end was identical on all three, down to a small clump of foliage to the left of the door (I only left this on one). As I didn't want three basically identical small houses looking like a modern estate, I modified one of them by sticking a rectangle of 10mm MDF on the underneath and chiseling away the resin ends under the thatch so I could add new detail. The resin is rather brittle and I accidentally broke off a few bits of the 'thatch' but that was easily repaired with Milliput. I added new detail using overlapping 0.25mm plastic sheet to represent planking and 0.5mm for the doors.

I was going to represent a simple cob construction for the lower walls but, as the small hall was half timbered I changed my mind and decided that this aspirational peasant would have used the same building style. The timbers are plastic strips, cut from 0.8mm sheet, with the infill a base layer of Milliput scored to represent an underlying light timber laths/wattle construction then roughly rendered with wood filler, leaving bits of the Milliput showing through.


After some helpful advise from John Boadal of the excellent Hand-Built History blog, I painted the thatch with Vallejo Khaki, dry brushed with Buff. For the 'hall' I then washed the thatch with Army Painter Dark Tone but I thought that gave too uniform an effect and hid the highlights so much that I had to reinstate them over the top so for the other buildings' thatch and for the wood on all four, I used the same technique as for my recent Sherman Tanks - two layers of Satin Mig Lucky Varnish applied by air brush then a wash of MIG-1005, Dark Brown for Green Vehicles Enamel Wash applied liberally then selectively wiped off after it had dried for an hour or so. I think this gives a better effect, especially in respect to the definition between the layers of thatch. 

I painted the plaster/daub on the walls with yellow ochre, progressively lightened with two layers of dry brushing. I guess this colour choice isn't very realistic but I thought that muddy brown walls to go with a muddy brown roof and grey-brown timber would be a bit lacking in visual appeal on the table. 


Tuesday 25 January 2022

3 Royal Tank Regiment in 15mm - 'Hybrid' Sherman Firefly

With 5 Skytrex and 5 PSC models, I had a problem - I would have to mix manufacturers within a troop and, though the models match quite well, I thought that would be too much. I decided therefore to modify a spare Skytrex M4 by lengthening the hull a bit, creating new engine deck details and adding the extra armour panels on the turret and hull sides. Fairly quickly I realised that would be a lot of work for questionable results but it occurred to me that every PSC sprue came with two upper hulls and two turret top halves for 75mm and 17pdr variants so I had 5 spares and decided to mate one of them with Skytrex lower hull and running gear components and scratch build the rest of the bits.


This was actually quite straightforward, if a bit time consuming. The only real problem was the join between the bottom of the glacis and the hull front so I hid that behind a lot of stowage, taking inspiration from a picture showing a similar arrangement. The running gear - track components from the M4 are obviously shorter than those of the stretched M4A4 and the track type is the rubber-block version that was apparently less popular with the British but this isn't too noticeable unless you are looking for it and the completed model blends in OK at normal viewing distances.

Sunday 16 January 2022

3 Royal Tank Regiment in 15mm - Skytrex and Plastic Soldier Co.

From what I've read, 4 KSLI most often found themselves partnered with the 3 RTR in 11 Armoured Division so that was the obvious choice as the main armoured element of my 1944 British force. 

When I first started collecting 15mm WW2, I naively thought a Sherman was a Sherman, only later learning that the British Armoured Divisions used the Sherman V - unfortunately I had bought and painted the wrong variants. I later bought five Skytrex models of the Sherman V / M4A4, including a Sherman Vc 'Firefly' but only got round to completing one of them before moving on to other projects. By the time I picked them up again, I had decided I wanted ten or eleven tanks to represent a squadron (3 troops of 3 plus an HQ of 1 or 2). Skytrex prices had increased from £10 for three tanks to £7 each. In the meantime injection moulded plastic had arrived and I couldn't resist a pack of five '15mm WW2 Allied M4A4 and Firefly Sherman Tanks' in the Plastic Soldier Company sale, for only £15. 

This mix of Skytrex and PSC models of course brings a problem of compatibility. The models actually match quite well in overall sizes but there are a few detailed differences and some features that one represents better than the other. It is interesting to compare the advantages and disadvantages of the two materials and moulding technologies. The PSC injection mouldings are crisper, with none of that distortion sometimes seen on larger spun-cast components from rubber moulds. However there can be no undercuts so many more components are needed and draft angles are a big issue, being very noticeable (for example) on the add-on armour patches on the hull sides. Because of the draft angle issue, PSC seem to have just given up with the pistol ports on the turret side and these bear little resemblance to the originals. There are also significant traces in some areas of what I assume must be scanning lines from a rapid prototype original or cutting the mould.

I corrected the hull-side armour patch draft angles on the PSC models by filing but there was only so much I could do with the pistol ports without effectively free-hand carving them from solid.

Both manufacturers give the M4A4 75mm a choice of the early M34 or later M35A gun mantlets. Most (but not all) of the pictures I found of 3RTR in Normandy had the M34A variant so I went with that. Skytrex use a one-piece casting which is much smaller and lighter looking and, to my eye, looks wrong so I took spare PSC Firefly mantlets and modified them to match the PSC M34A mantlet. I made the gun barrels using the same miliput around brass rod technique that I used to make lances for my Italian Wars Gendarmes.

I had bought some packs of Skytrex tank stowage and the PSC models come with lots items like spare tracks, jerry cans and idler wheels so I used a variety of these across both manufacturer's models.

You might have noticed in the photo above I glued the turret hatches on the PSC model the wrong way up. Even without this basic error, they stuck up much higher than they should and more than the very flat ones from Skytrex. I filed them down to match better and added details of the periscope and handle. The turret hatch diameter on the Skytrex model is quite a lot smaller than on the PSC model but there wasn't much I could do about that without major surgery and adding the same periscope details as for the PSC model would have just drawn further attention so I left them as they were.


The representation of the storage bin fixed to the back of the hull was very different - the Skytrex version was much too small and lacking the correct angle so the top points up when glued in place. Luckily the PSC sprues were almost the right cross section so it was easy to make new ones from those and bits of 0.25mm plastic sheet.

The bins on the back of the turret were quite similar and all I did there was make a new lid for the Skytrex models from 0.25mm plastic sheet to make sure it was square and had about the same overhang as for PSC.

One very noticeable defect on the PSC model is a series of trenches on the glacis plate, looking as though it was made up of separate pieces. Somehow I missed this on the first model but for later ones, I filled them in with Milliput, then scraped, filed and sanded to a smooth finish.

Skytrex on the left and PSC on the right.


PSC on the left, Skytrex on the right

With a bit of work I think the models match pretty well - certainly well enough to share a table, though maybe not side by side in the same troop. If I was starting from scratch, I suppose I'd have to choose the PSC version on cost and for having more and sharper detail but, even with weights added to the hull, there just seems something wrong with lightweight plastic tank models compared to the satisfying heft of metal and the PSC model takes longer to assemble and tidy up.

These are the first vehicles I have completed with air brushed panel hi-lighting, filters and washes, rather than my previous dry-brush technique. It was a lot harder and more time consuming than I had expected but I prefer the end result and I'm sure I will get better and quicker with more experience. 

The transfers are all from Skytrex. Although the real ratio is obviously one armoured regiment to one infantry battalion, I am only planning on representing one squadron - B squadron. 3RTR was the second most senior tank regiment in the division so a 52 on the red arm of service marking and yellow for the squadron marking.