There are many 16th century paintings and tapestries showing camps, including the French camp at Pavia. These show the typical medieval jousting tents and pavilions with multiple flags and banners so that set the basic requirement. I decided early on that I wanted two tents, a central flagpole and some other feature so bought a couple of circular tents by Bauda then an ox cart, pack horse and some barrels, sacks, a crate and a chest from Donnington.
When I tried to arrange these on a 120x80 mm base, two circular tents just didn’t look right so I eventually bought Bauda’s ‘King’s Pavilion’ to use with one of the round tents, the ox cart and various baggage to give a better composition.
The next problem was finding suitable figures to populate the camp and to give a sense activity. Whilst there are lots of purpose-made sets of 15 mm ancient and medieval camp inhabitants, there are none for the Italian Wars. The nearest civilian figures I could find were in the Minifigs Hussite range but these too are very medieval looking. One idea was to use artillery crew - I have a couple of Minifigs figures, carrying a buckets which would have been suitable but I needed these as artillery crew.
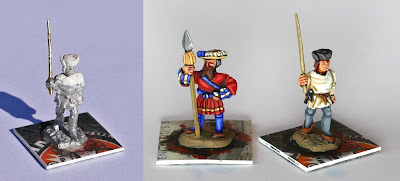
In the end I settled on just two figures. One was a medieval Donnington New Era horse handler figure (CB06) which I had bought along with the cart and pack horse. His most medieval feature was a hood and coif so I filed these off and gave him a 16th century hair style and hat from Milliput and a staff made from brass wire. So this would look more like a staff and less like a piece of wire, I filed it to a taper, added a few dents and lumps and bent it to be very slightly crooked. The second figure is a Freikorps Landsknecht provost. I have a couple of these from command packs and didn’t really know what to do with them - nice figures but un-armoured and not really right for the front rank of a pike keil. The only negative issue with these figures was that the partisan was poorly cast with a very thin shaft (actually with gaps in the casting) and a very thick blade - the overall effect was like a rugby ball balanced on a length of garden hose. I wanted to keep the cast tassel below the blade so I cut the head off, filed it down to a much thinner section and stuck it back on a 0.7 mm wire shaft.
Once the various elements were gathered together another problem emerged - the tents looked far too small compared to the ox, ox cart and figures. Obviously this is deliberate to keep them within DBA/DBM base sizes without making them excessively tall and thin. To disguise this slightly and add some more interest to the base, I built up the areas around and immediately under the tents with thick card and a 40 mm round MDF base, leaving the ox cart and driver on the lowest level and the guard one level below the tents. This added 4-5 mm and avoided the cart sides being above the edge of the round tent’s roof.
I had long admired Simon Chick’s Burgundian blog, particularly some of the incidental details like a cat raiding the camp supplies and his specially commissioned medieval hounds. So I thought a dog and/or cat would add a bit of interest to my 15mm camp. I couldn’t find a suitable cat but Minifigs make a dog, bundled in with cows or sheep, which looked OK. I had three goes at painting him and am still not really happy with the result - a sandy coloured dog against sandy coloured ground and a sandy-yellow tent wasn’t a great idea!
I placed the Landsknecht as though guarding the King’s pavilion and challenging the approaching ox-cart handler, with the dog coming round the end of the tent to see what was going on.
The final element was to add some flags. I made a big flagpole with the baggage piled up around it and a small flagpole topping the round tent. As with most of my figures, the flag staffs are made from tube on a wire core with the flag mounted on a separate piece of tube so they can easily be removed and swapped to allow the more generic units to serve in other armies. The flags themselves were drawn in Microsoft Excel and printed on an inkjet, as with my Swiss pike keil.
As ever, I would be grateful for any comments or suggestions. One of my main reasons for starting this blog was to try to pick up tips for improvement in my painting.


Really nice piece and I like the use of interchangeable flags. For the Italian wars changeable flags work really well as so many of the same troops fought for the different states and kingdoms.
ReplyDeleteAwesome paint work at this scale. Great inspiration.
ReplyDeleteThanks very much, both.
ReplyDeleteCamisado was one of the first Italian Wars blogs I found and I have been admiring your collection of figures and scenery ever since. I shamelessly copied the interchangeable flags idea but it took me a while to find the right brass tube to make them look indistinguishable to the solid pikes or lances in the same units and then to find a steel wire that exactly matched the central hole (0.7 and 0.35mm). I have only done French flags so far but my longer term plan is to have a few other options.
I have also been admiring Chrisfigures' blog, for a while, especially the 15mm Gendarmes and Swiss - very much the style and quality I aspire to one day.