Sunday, 17 July 2016

A small barn

I started this a while ago but was sidetracked by my French crossbowmen and distracted by work so made little progress. Another cause of delay was finding some suitably thick card for the steps - I started off doubling the mounting card I use for the walls but that was a huge faff and left an obvious line half-way up each step. Then I found an out of date catalogue about to go in the paper recycling with just the right thickness and in half an hour had my steps.

The idea was to make a small barn with space upstairs for one of the farm hands to live. The design is based a little on one of the out-buildings of a place we have stayed on holiday in France.

The method is the same as the other buildings I made - a basic structure from picture mounting card and bricks /stones made from cut up old business cards stuck together with wood working PVA glue. Once the basic structure is together, I give it a wash with dilute PVA and ready-mixed filler for strength, texture and to soften the edges.


I painted it with DecoArt Crafter's Acrylic - Country Maple as a base coat and inside then dry brushed with lots of Tan  and a little bit of Antique Gold (looked like yellow ochre to me) to break it up. To give a bit of variety I then picked out individual 'stones' in different browns, ochres, greens and greys. My first go used much too strong colours and after a massive amount of dry brushing with Tan paint, the effect was like a photo with way too much grain and contrast so I flattened everything down again with a wet dry-brushing of tan, reinstated some shadows and colour variation and re-did the colour picking out with more toned down colours.


After a more careful dry-brushing with slightly diluted Tan and then Tan-white, the rather vivid colours toned down and it all came together.


One thing I did very differently this time was the doors and shutters. Rather than using cardboard and using paint in lieu of texture, I tried to follow the techniques in this amazing building blog making buildings in foam board and used plasticard scored and shaped with a knife and textured with a suede brush. I think the overall effect is much better - more natural and easier but it does mean I have three buildings with very different woodwork.


Even so, the effect of the whole little village / hamlet is what I was looking for with a small jumble of mission tiled roofs and sun-bleached walls. 


Thursday, 23 June 2016

French Crossbowmen - Aventuriers (3) first group finished

I have finally finished the first batch of crossbowmen.

I think replacing the crossbows and so having the weapons all more or less the same size allows these originally very different figures to work together well, apart from the very chunky Black Hat figures which are marginal - two of Sebastien Chabal's ancestors playing their part in the Italian Wars.


I am pleased with the detail of the replacement crossbows, all the fiddly work making the bows, strings and bolts seems worth it now. I was in Venice ago few weeks ago, looking round the Doge's palace armoury and the modified crossbows with a relatively slender, metal bow with a simple curve seem a better match for the 16th Century crossbows I saw there than were the disparate cast metal crossbows the figures originally came with.


I have another 12 of these to finish now, two more guns, another general and some mounted arquebusiers (which will also need a lot of Milliput modification to make them look like they are from the 1520s). After that, Gendarmes and Archers (the mounted lancers)...


Wednesday, 18 May 2016

Jacques II de Chabannes - Seigneur de La Palice


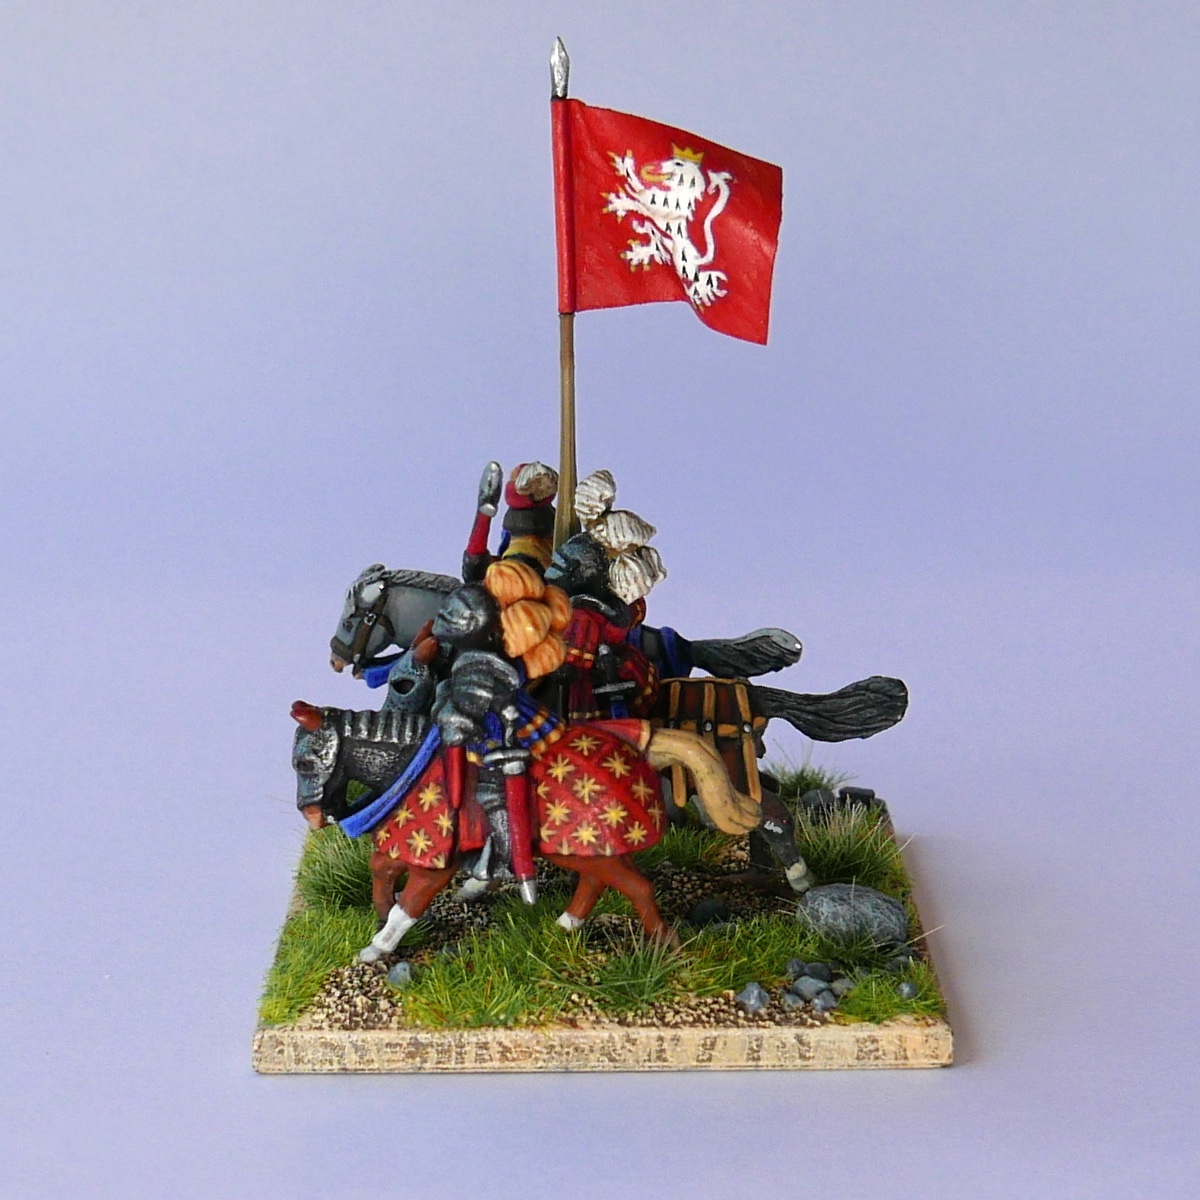
I have been rather busy recently with work and building some book shelves so had little time for painting. I have almost finished my first group of French crossbowmen but first, here is another general - this time a multi-purpose group, distinguished only by the banner as Jacques II de Chabannes, maybe better known as La Palice, one of the principal French commanders in the Italian Wars until his capture and execution by Imperial Landsknechts at Pavia.

I actually finished the figures a while ago but couldn't decide what flag to use. Some French leaders certainly used swallow tailed standards - those of Gaston de Foix and Louis de la Tremoille as well as those used by royal guard gendarmes are recorded in contemporary pictures but I haven't been able to find any others. Instead (and thanks to Stuart M and Olicana for the information and advise) I just used his arms as a banner. 

I found a suitably posed lion on the internet and printed off the outline of the flag about 1/2 inch high then overpainted it with my usual Vallejo paints to get a look that would be more consistent with the figure. 


As with my Swiss and Landsknechts, the flag is mounted on brass tube which fits on a protruding steel core so it can be removed and swapped for a different flag if I want a different selection of generals or a different nationality.


I plan to do one more multi-purpose general and a Francis I to complete my French commanders.


Monday, 8 February 2016

French Crossbowmen - Aventuriers (2)

The preparation and modification work is coming along. I have the first twenty figures (four each of five different castings) done.

The old TTG figures had enormously long crossbows compared with the others so I cut these down in length first. I cut the (rather Landsknechty) hats off the Old Glory figures and made new hats or helmets from Milliput. I also modified the sleeves and tunics on the Roundway and Venexia figures to make them look less medieval / like Swiss or Landsknechts respectively.

In most cases, I made new bows from 0.7 mm brass rod, flattened with a hammer and then filed and bent to shape.


I don't like the as-supplied Old Glory crossbows with their fat strings (about 3" diameter, scaled up) and solid metal between the bow and string. After removing the first two bows and making new ones, as described above, for the others I just drilled out the filled-in portion and did a lot of filing to make the bow and string as thin as possible.

With some figures having strung bows, I decided (slightly reluctantly) that I would have to string the others. This didn't prove as difficult and fiddly as I had expected. I cut suitable lengths of wire, pre-bent it by pressing the middle against my cutting mat and trimmed to length. I put a small blob of epoxy on the ends of the bows and another in the middle of the 'string', placed them roughly in place with tweezers then nudged them into place with the tip of a needle in a pin vise. The strings and bolts are from the wire on a bottle of Rioja and about 0.25 mm diameter - well over-scale but still much thinner than the cast ones. For those without a stirrup on the end, I made a U-shaped piece from offcuts and glued them on.

I'm not sure which figures to use for the last four. I have changed my mind on this a few times but I think I'll probably use the Black Hat / Gladiator Games figures - these are rather bulkier than the others but people vary in build and, as long as the crossbows match, I think it will be OK. We will see.

Tuesday, 2 February 2016

Scenery - another building

I finished this building a while ago but it has taken until now to get some photos of the finished thing. I tried to make this look as though the buildings had grown together over time in a slightly haphazard way, as often seems the way with old residential buildings. This was a much more complicated structure than the first one but I am much happier with the effect and think it looks more believable for a 16th Century village.

As I mentioned in the first write-up, I wanted a much less regular effect for the stone work so used different sizes of stick-on blocks. I did this by cutting three or four different width strips of card at a time and then chopping varying lengths off as I worked. I left one section without block work to represent rendering - partly for variety and partly because I was getting rather bored of tiny card rectangles.


I broke the construction down into several sections and only stuck it all together towards the end. Again the roof tiles were from sheets of Wills pantiles - not quite right and too big but I think the overall effect is OK. Once all the little pieces of card were in place, I gave the stone work a way over with a mix of PVA and filler to strengthen it and bring everything together by softening the sharp edges and adding texture.


The ridge tiles were made from bamboo skewers sanded to shape and then with razor saw cuts to represent the joins between tiles. To break things up a bit more, I painted individual blocks in for or five different shades of brown, grey and green with quite a high contrast before a lot of dry-brushing with lightened shades of the original stone colour to bring it all back together. I quite like the effect although I accept it isn't especially true to life.


Shutters and other woodwork were painted next, with the roofs and doors stuck on and the three modules stuck together last of all. 

As an aside, I'm not so sure about these external shutters. A lot of the photos I have seen don't have visible shutters so they may have been internal - certainly that would be a lot easier. 

I have only made one village area piece so far but I'll probably do another. As with my other FoG-R terrain, the idea is that only the area really matters for the game and everything must be able to be moved around to make space for figures. This seems to work less well for built up areas than for other scenery because buildings are so much larger and don't tend to be randomly distributed. It would be nice to have some walls, cottage gardens, carts, water troughs, carts, middens and the other paraphernalia of village life but I can't attach these to the buildings because that would make them too big to move out of the way during the game. I'll try to do these as stand-alone pieces but I'm not happy about the hard shadow line around the bottom of the buildings and it may need a bit of experimentation to find the right balance of game practicality/flexibility and appearance.


I'm making a small barn to add to these. I would like to have a church or tower of some sort too although the FoG-R terrain sizes don't give much space for such large buildings.

Sunday, 31 January 2016

French Crossbowmen - Aventuriers (1)

I always intended to have some light infantry crossbowmen for my French Army so I could use it for the earlier Italian Wars. I got as far as buying some Table Top Games figures many years ago and, a bit later, some from Gladiator (now Black Hat Miniatures) but never actually painted them. Partly I stopped because I wanted more variety of figures in the unit but then I dropped out of wargaming and they sat in a cupboard for a long time. When I re-started and decided to complete my small 16th C collection as an Italian Wars, French army for FOG-R, the problem of getting enough variety in the unit, whilst maintaining a reasonably homogenous look, remained. I bought various other crossbow-armed figures so I had the variety but several looked too early and every crossbow was different and incompatible and so they remained in the cupboard while I painted other units.

From left to right: TTG, Gladiator, Naismith, Naismith, Essex, 4 from Old Glory, 2 from Venexia


Now I have almost got a 900 point army finished, I just need 8-12 bases of Adventurier crossbowmen for my early army and 4 bases of mounted arquebus for my late option. Either will involve some substantial modification work so I have finally made a serious start.

From experience with my Swiss, Landsknechts and Gendarmes, I think quite large differences in figure size and style look OK as long as the weapons are fairly uniform. Achieving that was easy with pikes, quite easy with heavy lances but a bit more of a challenge with crossbows.

The cast crossbows vary in length from 9mm (Venexia) to 14 mm (TTG / Altuos) and in span from 8 mm (Venexia and Old Glory) to 11.5 mm (Essex). There is also a lot of variation in shape of the bow - whilst contemporary crossbows seem to be mostly thin steel, these were all quite think with the TTG bow apparently 1.2 mm in diameter - like a scaled down 5" fence post. Even worse, the Old Glory figures come with a solid mass of metal filling in between the bow and the string.

I decided to cut the longest bows down in length and replace all the actual bows with flattened, shaped (with a needle file) and bent pieces of 0.7 mm brass rod to give a pre-bend span of 8-9 mm. This isn't quite as fiddly as it sounds but it is much more of a faff than just replacing cast pikes.

After cutting the bows (and string and fill-in metal) of the first couple of Old Glory figures, I found I could get quite a reasonable effect by drilling out the filled-in area then cutting and filing away to just leave the thinned bow and the string. It isn't quite the same as the brass bows but I think it looks OK and matches in reasonably. It does raise the question though of whether I should string all the others.

The second issue is that some of the figures are very medieval looking. Also the hats on the Old Glory figures don't look very French to me.

I have been following Stuart's blog about converting 28mm 15th Century figures to represent early 16th C French. Fantastic work with a lot of original research and far beyond my abilities but he shows how to put together some great French skirmishers with crossbows and arquebus and I decided to try something similar with these smaller scale figures. I have chosen what I think are the most suitable figures - 4 each of 6 different ones for my 12 bases - and started modifying them by filing and adding Milliput. There's a long way to go with this but I am quite encouraged so far.

This shows the brass replacement bow v cutting away on the Old Glory figures. The three OG  figures will get new hats made from Milliput, as I did with my French arquebusiers. The other three figure types I chose are the Venexia figure with a helmet, the Naismith figure winching and either one of the OG firing figures or the other Naismith figure or maybe two of each.


Monday, 4 January 2016

Swiss Arquebusiers

I finally finished the arquebusiers to screen my Swiss pike keil over the Christmas holidays, in time for a FOG-R game yesterday against a German States army. 


The figures are from Khurusan, the same as most of those in the keil. Like the other Khurusan figures, they are quite slender (or realistically proportioned, compared with the stocky cartoon figures from most other manufacturers) and well detailed but maybe not the easiest figures to paint. 


The Swiss banners are based on information from Massimo Predonzani’s book on the battle of CĂ©risoles. He states that by 1525 infantry flags were 3.7x2.8 m. On the basis that 15mm (in reality 16-18mm ground to head) is about 1:100 I tried 37x28 mm but that looked far too big. For the pike block I reduced the flags to about 24x32 but even that seems big - to the extent that they interfere with the pikes in the third rank. If I had realised before basing just how big they would be, I would maybe have used a double-depth base for the centre of the keil and put all the flags on that. I further reduced the flag for the Aquebusiers to 20x27 mm - it still looks big but is rather more manageable. 

The Swiss flags were drawn using the basic drawing tools in Microsoft Excel (not an obvious choice, but I use spreadsheets a lot for work and it was to hand) and printed out on an inkjet so it was easy to play around with sizes.


Does anybody have other information on likely flag size for the Swiss in the 1520s and 30s?