Saturday, 6 March 2021

More Late Romans on Parade

Now I have finished* all the units using the old Asgard and Minifigs figures, I thought it would be a good time to take stock and have a look at what I have done so far. 

[* "Finished" if you don't count the extras I'm planning to give the legionary units the option of having eight bases and/or integral bowmen and some clibanarii with bows and half-armoured horses that I may complete two extra bases with my existing cataphracts. Finished enough for a usable army, anyway!]


In total I have painted 108 infantry, 58 mounted figures and a couple of wild boars since January 2019. Not exactly a lightning fast pace!

To make this a usable army, I need two more 6-base infantry units and at least one more sub-general.

For the infantry, I  have gone for modern Legio Heroica figures with LBMS shield transfers. I'm part way through the first unit and, thanks to their mail only needing a dry brush with gunmetal and the shield transfers rather than laboriously painting all that un-historical leather armour and having to hand paint all the shields, this should go fairly quickly. I've also got three bolt throwers - also Legio Heroica. 

I bought a couple of mounted command groups from Legio Heroica too. They are nice figures but they look so different to the rest of my cavalry and generals that I might just scour the spare figures box for another sub-general or two.

All in all, that gives me 52 more infantry and 3 or 6 more mounted to paint for a usable army. My target is to have this done ready for a game as soon as the rules allow in the summer.


Sunday, 28 February 2021

Late Roman Horse Archers - Equites Secundo Sagittarii


This is the last full unit to use up my old 1980s figures and the last cavalry unit for this army. 

The basic figure for the riders is an Asgard (later Table Top Games and now Alternative Armies' Isarus range) LRC1 Late Roman Horse Archer. As usual with figures of that vintage, there was only one variant so, to get more variety, I did a couple of head swaps from spare helmeted figures and made typical late Roman round hats for three more from Milliput. I'm not sure why they are all holding their bows in their right hands - unless they really are all left handed it seems an awkward way of doing things.

I modified the cloaks too - in some cases I just filed bits off but for others I made new folds from Milliput. It all adds to the variety and I think if the cloaks and heads are varied it looks less strange that there is only one pose.

One of the 8 had been damaged so I cut him off at the waist and replaced the top half with that from a G7 Goth Archer Advancing. It would have been good to have one or two more changed like this to a completely different pose but was such a fiddly job that I left it at just the one. I think the grey blob on the horses tail must be from a bit of plasticine that I used to hold the figure whilst the epoxy dried. It disappeared in the pre-painting detergent wash anyhow.

The other modification I made was the shields. The basic figure has a very small round shield with a textured sort of surface, a bit like those 1970s pub tables with a hammered copper top. I wanted to paint the shields with one of the designs attributed to Equites Sagittari in the Notitia Dignitatum so needed something a bit bigger with a boss. After early attempts at cutting or punching circles of plasticard, I requisitioned some small sequins from my wife's sewing supplies and used those. I roughed the surface up with sandpaper and made the shield bosses from Milliput. The sequins are thin (about 0.2 mm) but I guess that is actually more realistic than cast shields that scale to about 4" thick!

As with my other Late Roman mounted  units, the horses are a mix of Minifigs and Asgard and I accepted the odd mix of walking and galloping poses in the interest of variety. By this stage, I was really scraping the barrel for usable figures so had to make new tails for a couple of horses where the original cast tail snapped off in the the process of removing old, badly applied paint.

The white of the painted shield design is my standard off-white Vallejo sequence of Khaki Grey, Iraqi Sand and Ivory. I really like the warm effect this gives but in this case I think it was a mistake as being too close (or identical) to the white of most of the tunics and not enough of a contrast to the yellow of the shield rims. A grey or grey-blue sequence might have been a better choice.

The one thing I really wasn't happy about with this unit was the horse colours. I've been trying to get a bit more variety and some of these just haven't worked out well. I'll need to have a proper re-think of this before I tackle any more cavalry units but, as this is the last one for this army then Normandy 1944 is next in the queue, there is no urgency.


Friday, 26 February 2021

Late Roman sub-general


This command element is a real mix: a Gladiator Games one-piece casting for the general, a modified Minifigs heavy cavalryman carrying the vexillum and a Minifigs trumpeter on a horse I found in my scrap and spares box.

The original premise of this army was to make productive use of figures I had bought dating back to the 1980s. By this stage the leadpile is rather depleted and I'm having to either make do and mend or order new "old figures" in penny packets with prohibitively high postage costs, rather negating the original point. The vexillum bearer is a good example of this. I had a couple of Minifigs heavy cavalry where the hand holding the lance had broken off in clumsy attempts to drill through it back in the day. I repaired this by drilling into the arm, making a loop of thin steel wire (from a wire brush) to secure the vexillum shaft then making a new hand from Milliput. The hand is a bit too big and lacking in detail but doesn't look too obvious on the finished item. I soldered the cross-piece, made the vexillum from aluminium foil and the disc with a  slice from a circular piece of plastic.

To secure the shield on the ground (the colour denoting what category of commander), after some problems with the army general, I initially tried a piece of the flexible magnet that I use for bases but such a small piece didn't give a strong enough attractive force so I reverted to a rare earth magnet, even though these are too strong. I don't suppose I'll be swapping the shield colours round that much really.


I need at least one more sub-general. Although I have bought the necessary figures for two command bases from Legio Heroica, along with my last two infantry units, at the moment I'm inclined to stick with the 1980s recycled theme and make something up with whatever figures I have left over.

Thursday, 4 February 2021

Late Roman Camp


I struggled for a while to think of how to depict a fortified camp for my Romans. Although there are some excellent castings of classic Roman camps fortifications and tents available, these never look right to me when the constraints of a 120 x 80mm base leaves space for only one or two tents - hardly enough for a patrol let alone a whole army! I considered just doing one corner of the camp or a gatehouse but that only really works if the camp is placed against a table edge.

Of course the camp doesn't need to be a literal camp - just something to represent logistics or something of consequence if captured by the enemy. In the case of a fortified camp, it also needs to look defensible. Whilst browsing for ideas, I came across this picture of a reconstructed Roman watchtower on Wikimedia Commons by Longbow4u under a creative commons licence.

So I decided to make my camp a scene around a roman watchtower based on this one. Apparently it was later realised that Roman watchtowers had an extra story - it must be said that the reconstruction looks rather stubby and not likely to provide a very good vantage point but stubby was good for my purposes as I wanted the complete camp to fit in a Useful Box with the rest of the army.

My start point for construction was a couple of 40x40mm laser-cut MDF bases as floors, two more as sides for the lower story and two 40x30mm bases as sides for the top story. I cut the other sides by hand from 2mm MDF then drilled holes for the rounded tops of the arched windows and door. The floors and roof were cut from mount board and the main base unit, again, was laser-cut MDG, backed with self-adhesive magnetic sheet from Magnetic Displays.

To populate the scene around the tower, I bought the pig-roast set from Baueda and re-purposed a couple of standard bearers (chosen because they were not carrying shields): a stocky Asgard figure in a round hat to act as the cooking supervisor and a standard bearer from Gladiator Miniatures, repurposed as an auxiliary infantryman who'd set his shield aside, to look out from the viewing platform. The Baueda figures have short-sleeved tunics so I modified them with a bit of filing and Miliput to have long sleeves to match with my other auxiliary infantry.

And there I stalled for a long time. 

Two obstacles: a ladder to provide access to the platform and how to make the characteristic X-shaped railings? 

I ran through various ideas for the railings, none of which seemed practical but the eventual solution was quite easy. I cut the rails and uprights from 1mm square section plastic and glued them together on a carefully drawn template. For the Xs , I cut a trip of 0.7mm Plasticard, scribed it off to the correct height with the sharp corner of my vernier calipers, drew on the X and cut it out with a sharp knife. It sounds a faff but it really was quite easy, if repetitive.


The ladders arrives in a pack of two long lengths from Plastruct - gives me some spare to be left in Normandy orchards, barns or wherever. The side rails on the ladders are very thick so I thinned them down considerably before painting.

The roof tiles are the last of the Wills Pantiles, that I used for my Italian Wars buildings. Flushed with enthusiasm, I ordered another pack with future ideas of renaissance towers and 4th C basilica. The ridge tiles are bamboo barbecue skewers with a V sanded onto one side and thin saw cuts 3 or 4 mm apart on the other then whittled to give the appearance of overlapping tiles.

I used my usual buildings technique of sticking on small rectangles cut from old business cards to represent stone blocks then gave the wall and roof surfaces a wash over of dilute filler to add texture and smooth out the sharp corners. 


As I mentioned, I wanted the finished camp to fit in a Really Useful box and even with this "one story short of a tower" reconstruction, that wasn't possible so I decided to split the roof off, attached with magnetic sheets into a square recess.


I paint pantile roofs with a tester pot of terracotta textures masonry paint. Next, I pick out individual tiles in contrasting tones of browns and greens. At this stage, it has far too much contrast but it all works out in the end. The next step is a wash of black Humbrol enamel and white spirit then finally (done after the photo below) a dry brush of the original masonry paint to blend it all back in 


I follow a similar process for the walls but with even more dry brushing. After an initial coat of DecoArt Country Maple, I dry brush Antique Gold (actually a yellow ochre) and Sandstone before picking out individual "stones" in different shades of brown, grey and green then more dry brushing with gradually lighter tones to blend it all back. There is no particular logic to the colour variations but the earlier buildings I did without this step just looked a bit plain.


The base is covered with the same combination of filler, grit, sand, static grass and tufts that I use for all my figure and scenery basing.

As well as the figures and pig roast set, I made a couple of spears and shields and discarded helmet from a spare Minifigs figure, as though the two cooks had set their weapons aside for a while whilst they prepare the food for the rest of their colleagues in the Petulantes Seniores.


Wednesday, 20 January 2021

Late Roman Cataphracts


This unit started with three packs of Minifigs figures from the 1980s. Whilst the scale-armoured horses were quite well proportioned, the riders looked thin and decidedly un-menacing - certainly not the look one wants for a unit of cataphracts! 

The Asgard range that came along soon after had the opposite problem with much more imposing riders but perched on overgrown Shetland ponies with stubby little legs, 2 or 3mm shorter than those from Minifigs. I decided to mix and match but got no further than painting the first half dozen before the project stalled.

At some later point I bought a pack of Gladiator Games command figures with a couple of nice mail-armoured horses but riders that matched neither Minifigs nor Asgard figures.

When I picked up this army again I bought another pack of Minifigs for the horses - with a different rider to the original 80s version - and some more Asgard riders, now from Alternative Armies, who were kind enough to sell me only the riders I needed, rather than insisting on the rider and horse together - a standard option from them now I see, and very welcome. 

Sadly time seems not to have been kind to the Asgard moulds or masters and the castings I received were very poor, with lots of flash, thick areas of excess metal in the undercuts (visible under the right side of the cloak), miscast mace handles and feet, and a generally blobby and rounded appearance compared to the 80s originals. Lots of fettling work before assembly and painting.

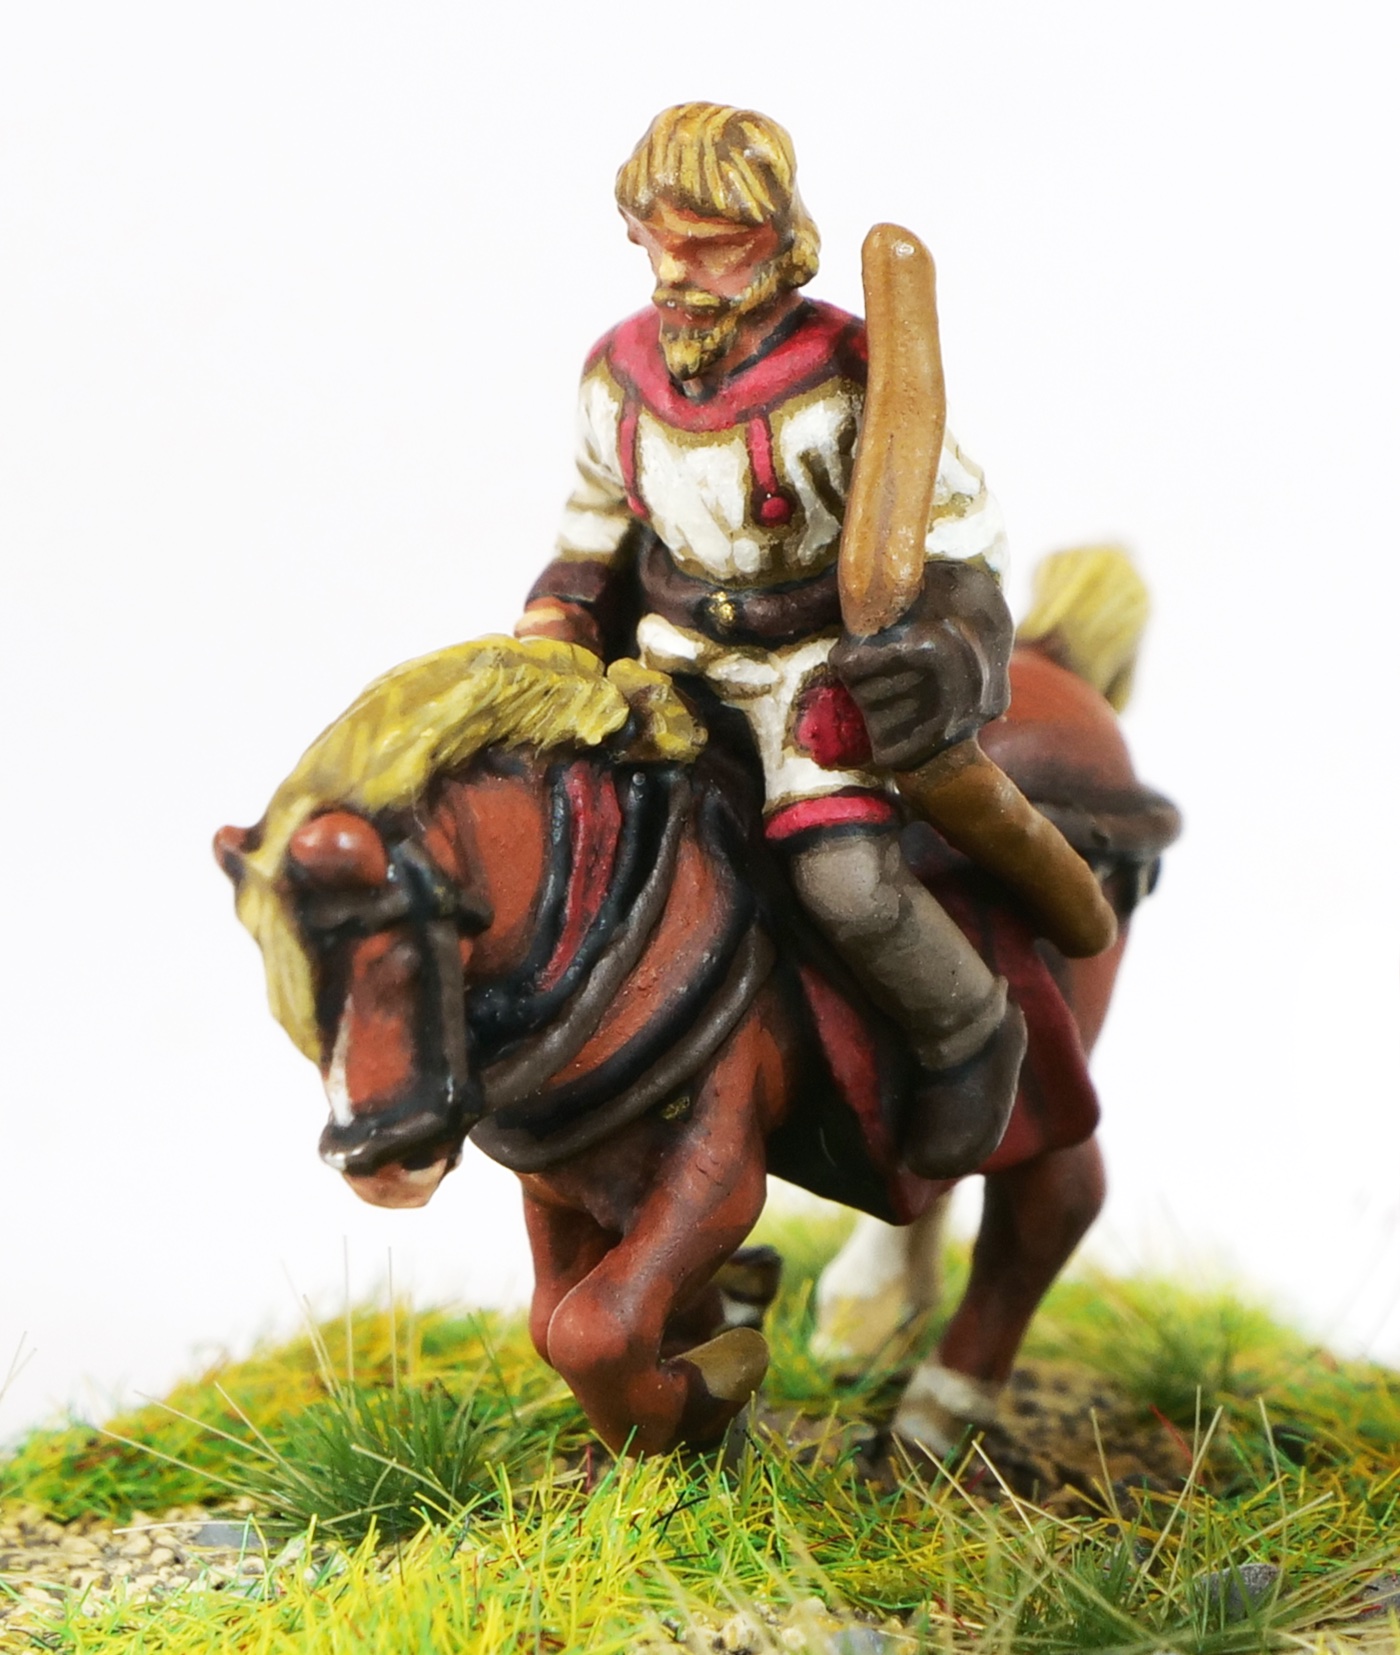
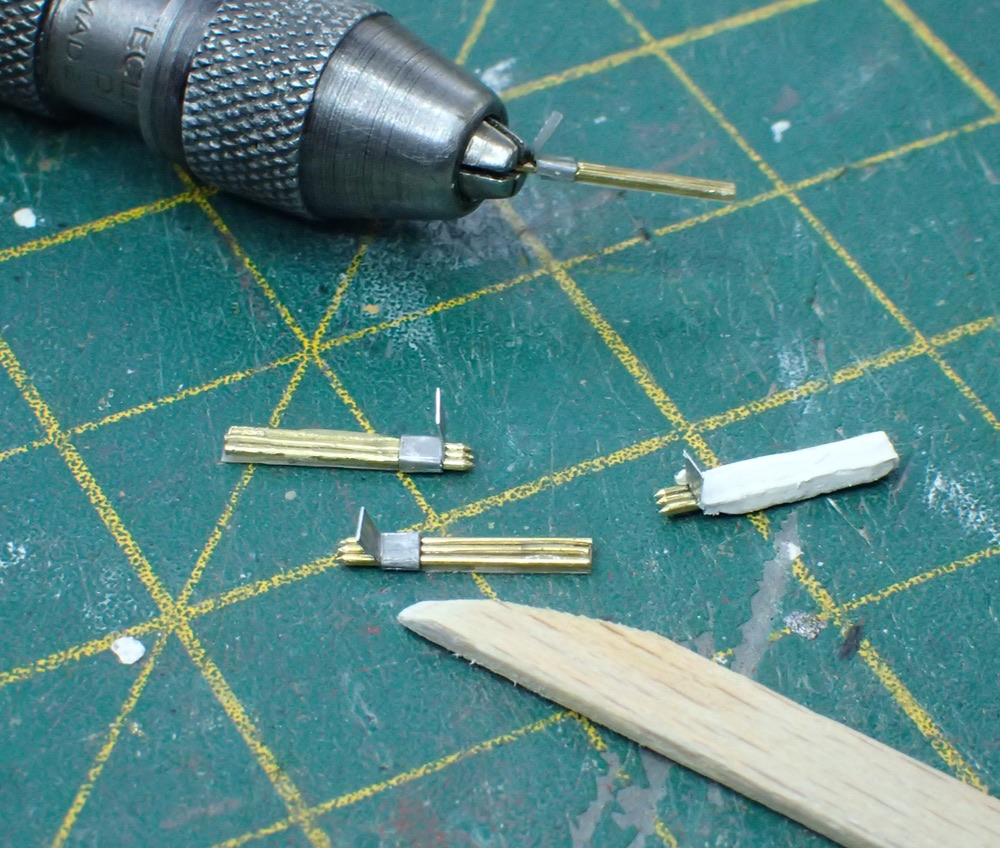
My ideas for this unit was inspired by one of the pictures in the Osprey book: 'Late Roman Cavalryman AD236-565' which showed cataphracts with thin streamers hanging from their kontos. I was going to replace the cast lances with brass rod anyway and decided to make some streamers using thick aluminium foil from some old tube of paint or toothpaste that had been in my box of useful bits for years. 

One of the unsatisfactory things about these old figures is that there is typically only one variant. The Asgard riders had an officer and standard bearer with different crests and cloaks (I had 3 of these) and I got more variety by changing the angle of their lances, removing the crests completely from a couple of figures and carving the cloaks around on some figures. For the single variant Minifigs horse, I bent some necks to left or right and remodelled some of the tails into a plain un-knotted version or bent them to either side. In a few cases, this proved too much and the tails broke off altogether so I had to make replacements with Miliput on a wire armature. I also sharpened up the definition between the armour scales using the point of a knife.

My intention was to paint six bases of three figures per base - four packs of 4 Minifigs horses plus the two from Gladiator. However I belatedly realised that Mortem et Gloriam recommend four per base for close order cavalry, such as Cataphracts so changed my plans to four bases of four and duly painted sixteen figures. There was a problem though: the figures are too wide to fit four to a base without staggering them front to back so they could overlap and even then they would be almost touching. On the other hand, three to a base is just the same as the other loose order cavalry and looked sparse.

I asked for advise on the MeG forum to see what other players did but, though nobody thought there was any problem caused by basing three to a base, there was a split between those who preferred four for the added heft imposing appearance and those that preferred a bit of space between the figures and getting more bases for their money and painting time. 

The issue was decided for me because I couldn't find one of the two spare riders I would have needed for six bases of three. I suspect the cat is to blame - he takes much too close an interest and thinks small models or components belong on the floor. 

Now the basing is complete, I'm pleased I went for four figures to a base - those that said it gives a satisfying heft to the unit were right. In any case, all the troop types in this army are so expensive that I'll never have the points for a unit of six cataphract bases.

Because having the figures so closely packed would leave little space for access, I textured the top of each figures base with sand and painted it before sticking them down so I'd only have to fill the gaps and add the static grass and tufts afterwards. 


A couple of notes on painting. The cloaks started off with Vallejo 3/4 gold brown 1/4 olive brown. The mid tone is straight gold brown then with some white added as the high light. The bronze armour is an initial base of Vallejo bronze, a wash of Army Painter Quickshade Strong Tone then high-lighted with bronze lightened with a touch of gold.


Monday, 2 November 2020

Late Roman Heavy Cavalry: Equites Honoriani Taifali Iuniores

My last unit with hand painted elaborate shields. I have the figures for two more bases so I will have the option of a 4 or 6 base unit but first I'm concentrating on getting all the Cavalry units with 4 bases and all the infantry with 6. I will bother about the extras and alternatives once I have a usable army.

Again this unit is mix of Minifigs and Asgard figures originally bought in the 80s with a few more recent extras to make the numbers up. By mixing up the two Asgard and one Minifigs cavalryman figures (plus command figures, with a bit of head swapping and modification) and alternating Asgard and Minifigs horses, I wanted to break up the 1980s monotony of mono-posed figures. Of course the down side of that is having to accept figures with very different kit: Minifigs with spangenhelm helmets, scale armour and no cloak with Asgard figures with an Attic-style eastern or spangnhelm helmet, mail and cloaks. The Asgard officer and cavalryman with spangenhelm helmet had rather large shield bosses so I filed those off and replaced them with Milliput to match the size of the others. As usual, I drilled out the figures hands and replaced the cast spears and javelins (and in the case of the office, his mace) with brass wire spears so these were all the same.

I've rationalised the remaining lack of uniformity with a story. This unit has a mix of veterans from the Danube frontier (hence the spangenhelm) and more recent recruits from the wars against Persia and now serving back in the North. Those soft Southerners are feeling the cold a bit and wearing their cloaks whilst the veterans are already too warm, so have stowed their cloaks behind them (from packs of Skytrex WW2 vehicle stowage) and are wishing they could take off their armour and head down to the quayside where a short-sleeved tunic is more than enough insulation against the refreshing Northern breeze. I'm choosing to ignore that scale armour is supposedly more characteristic of Eastern troops.

Another thing that has bothered me about those old figures is that, whilst all the army lists gave them javelins and spears, they are cast with one or the other. For my Illyrian unit, I got round this by having them hold spears in their right hand and a few javelins in their left, behind their shields but that seemed unsatisfactory so, for this unit, I made javelin quivers with two or three javelins from 0.5 mm brass rod (my spears are an over-scale 0.8mm) glued to a paper back with aluminium foil flaps and Milliput to represent the "bag". I held then in a pin vice to apply the Milliput, as in the photo, then again after the Milliput had cured to clean it all up. The rather short conical points are meant to represent the counterweight / non-sharp end of the javelin as shown in Osprey's 'Late Roman Cavalryman AD 236-565'.

I chose the shield pattern partly based on colour and partly because I felt I should have some shields with animals (albeit mythical ones). I only realised later that this is one of the handful of Late Roman shield patterns offered in the excellent Little Big Men range and so my hand painting efforts to get something unique are, yet again, going to be upstaged by every Late Roman army with Legio Heroica or Khurasan figures having a much superior representation of the same unit.

I made a new vexillum from brass rod with the cross-piece soldered and aluminium foil to replace the thick cast one on a bendy and fragile pole. Its bearer also got a new head from a spare infantry figure to replace the classical looking helmet of the original figure. I wish now that I had done a few more head swaps for ridged helmets to tie their appearance in  better with the infantry.


I have a unit of cataphracts in the painting tray now then another general and figures for the camp.