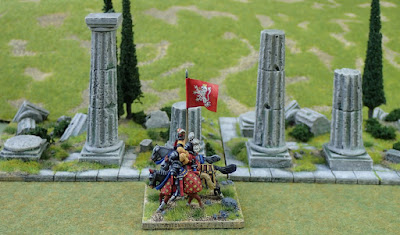
I looked out for a suitable model - ideally not very big or expensive - for quite a while. There seemed to be a lot in 28mm, and some brilliant but large and expensive complete models but nothing small and cheap for 15mm. By chance, I then stumbled across some resin cast pillars at a Wargames show. I think they were on the Magnetic Displays stand, though I can't now find them on their website. With 2 x 55mm high fluted columns for a pound, they were perfect for my purposes and I bought a couple of packs.
The pillars were sculpted as though made from three pieces and without plinths and capitals. To avoid having all four identical heights and appearances and make them go further, I cut up two of them - the top tier off one and the top and middle of the other then cut two of these pieces lengthways at an angle so I could place them to give the appearance of half-buried pieces. I made the plinths and capitals from card, foam-board and 2mm mdf. After sanding the sawn ends flat, I distressed them and the exposed mdf of the plinths and capitals to give a worn and weathered effect - probably more than is realistic but sometimes wrong looks right.
The foam-board for the plinths was a bad idea as it is a weak point that I can easily imagine breaking at the slightest rough handling. I'm not sure whether to reinforce them now with a screw from the base (and risk damaging them) or see if they do actually break.
The base boards are 2mm mdf and I marked it out in 10mm squares to get the thin card paving slabs (9.5mm squares) and column plinths spaced evenly.
The next step was to cover the bare mdf parts of the boards with filler to represent the build up of debris over and around the ruins in the thousand years or so between the end of the Roman Empire and the Italian Wars. At this stage, I also attached a few small rectangles of foam-board to represent fallen blocks of masonry.
I left a couple of areas of bare mdf on top of the high points to give a good surface to attach the cypress trees.
I then covered around the roots and textured the filler with sharp sand and small stones. The whole thing (apart from the trees!) was given a coat of brown emulsion, decanted from a big pot I bought as and end of line item some years ago.
For the temple stonework, I used a wash of Humbrol black enamel paint in white spirit. When that was completely dry, I gave it a heavy dry brush of Vallejo 987 Medium Stone. Dulux Bleached Lichen 1, which I have in my scenery paints box and use for roads, looks virtually the same and would have been cheaper.
When that was fully dry - overnight - I applied a thin wash of a medium green in the cracks, recesses and around the base before dry brushing again with Dulux Bleached Lichen 2 and a final light dry brush of Dulux Bleached Lichen 2 mixed with about white.
The 'earth' areas are my usual basing / scenery ground recipe: dry brush yellow ochre then yellow ochre + white with static grass and tufts applied with PVA. I also added some dark green clump foliage and a bit of foliage net to represent a climbing plant growing up one of the columns.


Crackin' work!
ReplyDeleteThanks Ray.
DeleteReally nice ruins! I'd best add them to my to do list! I have used a pre drilled teeny tiny brass screw in the past to hold some large metal figures I was worried might go over,probably worth a go?
ReplyDeleteBest Iain
Thank you. I think you are right - better to do the reinforcement now, before it breaks and damages the visible surfaces. On my jobs list for today.
Delete